


Calrl Goldberg Tiger 60 Build
 03-15-2018, 11:45 AM
#351

Vincent thinking about your fuel system, I assume it has a vent line going out of the plane and don't that vent line act as an overflow for when the tank is being filled thus ending up on the ground, grass or what ever, well there is a simple solution for that that most of us use out where I live. We have a 2 or 4 oz. tank that is connected via fuel line to that vent line to catch that small amount of spilled fuel when filling the tank, two de-fuel turns of the crank or reverse switch will siphon the fuel out of the overflow line and not spill a drop disconnecting from that vent line and you don't half to see your tank when filling it. Just a thought worth about 2 cents.
Leroy
Leroy
 03-16-2018, 06:00 AM
#352

Thread Starter
That's a very good practice to do Leroy using a smaller tank to catch the overflow fuel. Unfortunately, I've seen when most people refuel they let the fuel gush out from the bottom of the vent line to the ground below. The gas tank that I use is crystal clear just like the canopy, so I always stop before the tank is 100% filled, preventing fuel from going on the ground.
I checked on the status of my battery, and it should be waiting for me when I get home after work! I can get it permanently installed... now if I can only make the snow disappear!
I checked on the status of my battery, and it should be waiting for me when I get home after work!
I can get it permanently installed... now if I can only make the snow disappear!
Last edited by VincentJ; 03-17-2018 at 08:09 AM.


 03-18-2018, 08:14 AM
#357

Thanks Leroy, nobody here to stop me  ...and it's warmer than my shop.
Thailazer, I am using Windex to apply the second trim coat. The Windex does not soften the adhesive as some have suggested in other threads, but I find that it does a good job in making the trim piece(s) lay down flat. I use a squeegee and remove as much of the Windex as I can, then careful heat management using an iron secures the trim piece in place. By keeping my iron temp between 148-160 degrees I don't make those bubbles between coats of covering. I also find that immediately after ironing, I follow behind with a cloth or mitt to rub the covering in place also helps.
I don't rely on the temp settings on my iron, I use a non-contact infrared thermometer to give me accurate temperature readings.
...and it's warmer than my shop.Thailazer, I am using Windex to apply the second trim coat. The Windex does not soften the adhesive as some have suggested in other threads, but I find that it does a good job in making the trim piece(s) lay down flat. I use a squeegee and remove as much of the Windex as I can, then careful heat management using an iron secures the trim piece in place. By keeping my iron temp between 148-160 degrees I don't make those bubbles between coats of covering. I also find that immediately after ironing, I follow behind with a cloth or mitt to rub the covering in place also helps.
I don't rely on the temp settings on my iron, I use a non-contact infrared thermometer to give me accurate temperature readings.
I was reading posts about using Windex a few months back and cut out several 1 inch squares of Monokote to test various fluids. Windex and ammonia had virtually no adhesion strength. Acetone and trim solvent were very well attached, and the ones I coated with lacquer were permanent.
Your project looks like it is ready for some spring sunshine!
03-18-2018, 01:50 PM
#358
Thread Starter
[QUOTE=thailazer;12413977]Thanks for those specfics! As Lord Kelvin said.....I was surprised to see how long it took for the iron to stabilize at a temperature.
Thailazer, when I plug in my iron, I always have to wait about 10 minutes before I use it because I too have to wait for it to stabilize. It usually goes well above temp before it stabilizes to the right temp that I'm looking for. By monitoring the temperature with my non contact thermometer I know when my iron is ready for use.
I have just a few more things to finish up on before my Tiger before it takes to the skies, I ordered a 8" extension lead for the balance plug on my Life battery. I am also waiting for 1/8" ID fuel line so I can re-plumb the fuel clunk inside my tank. I refuse to use yellow Tygon fuel line inside of my tanks because after only one season of flying they always get stiff and require replacement. The last item to complete is to balance my plane, the list is short, but I'm in no rush as I have to wait for the snow to melt anyway...
Last edited by VincentJ; 03-19-2018 at 03:38 AM.
 03-19-2018, 05:22 AM
#360
Thread Starter
Mike good question! An excellent replacement would be a Viton fuel line with a Shore hardness (Durometer) of 60. If you're not familiar with Shore hardness (this is just a way to determine the hardness of polymers, elastomers, and rubbers), you may be purchasing fuel line that is too stiff for what you want it to do. Purchasing a Viton fuel line with a shore hardness rating of 70 will get you a line that may prove to be too stiff for its intended application.
You may then wonder as to why not use Viton fuel line for all of the lines in your fuel system? Well you could, however Viton fuel line is black in color and that would prevent you from seeing what's inside of the lines, which is why most will opt for transparent types of lines. There are other types of gasoline resistant fuel lines out there as well, Sullivan has a new type of line out now called ProFlex which I will be using for my clunk. Be prepared for some sticker shock, as these lines will set you back about $8.00 for 2 feet.
https://www.towerhobbies.com/cgi-bin...?&I=LXGFHS&P=M
After just one season of flying, using yellow Tygon fuel line on your clunk will stiffen and require replacement. Some gas tanks are easier than others to remove, so this can be an undesirable job. Selecting alternative fuel lines for your clunk will keep it flexible much longer. (I do use Tygon outside of the fuel lank)
Last edited by VincentJ; 03-19-2018 at 09:39 AM.
03-21-2018, 02:53 AM
#362
Thread Starter
I received the fuel hoses in the mail yesterday that I had ordered and I am very impressed with how flexible the Sullivan ProFlex lines are. They should do very nicely for the clunk in my gas tank... If you're considering trying them, these hoses come in two different sizes, Standard and Large as indicated on their packaging. The Standard lines have a 3/32" ID while the Large lines have a 5/32" ID dimension. I ordered both sizes and found the Large size to be the one that I will use.
Last edited by VincentJ; 03-21-2018 at 05:12 AM.
03-21-2018, 09:21 AM
#364
I have to agree with OKC, I'm glad to read you went with the larger hose in tank.
Many people just assemble their tanks with what comes in the package. They forget that FUEL QUANTITY FROM THE TANK is just as important as needle settings. Some try to use tank pressure to force fuel through the lines, others use pumps. In the process, most don't think about how much pressure it takes to get a given amount of fuel through a smaller line to get a larger engine to run properly. In my boats, I tend to drill out the tank stoppers to allow for a 5/32 ID tube to fit so I can get enough fuel to the carb. To go smaller, especially with an 11cc(.67) sized engine, would result in a lean condition that would result in detonation and a damaged engine
Many people just assemble their tanks with what comes in the package. They forget that FUEL QUANTITY FROM THE TANK is just as important as needle settings. Some try to use tank pressure to force fuel through the lines, others use pumps. In the process, most don't think about how much pressure it takes to get a given amount of fuel through a smaller line to get a larger engine to run properly. In my boats, I tend to drill out the tank stoppers to allow for a 5/32 ID tube to fit so I can get enough fuel to the carb. To go smaller, especially with an 11cc(.67) sized engine, would result in a lean condition that would result in detonation and a damaged engine
03-23-2018, 03:45 AM
#365
Thread Starter
School work has been very demanding these past few days and I've not been able to get down in my workshop. Looking forward to getting the last few items completed this weekend! Stay tuned...
Tiger 60 Punch List
- set-up choke and linkage
- finish plumbing fuel tank
- check CG and adjust if necessary
- photos of completed plane
Tiger 60 Punch List
- set-up choke and linkage
- finish plumbing fuel tank
- check CG and adjust if necessary
- photos of completed plane
Last edited by VincentJ; 03-23-2018 at 03:52 AM.
03-24-2018, 02:49 PM
#366
Thread Starter
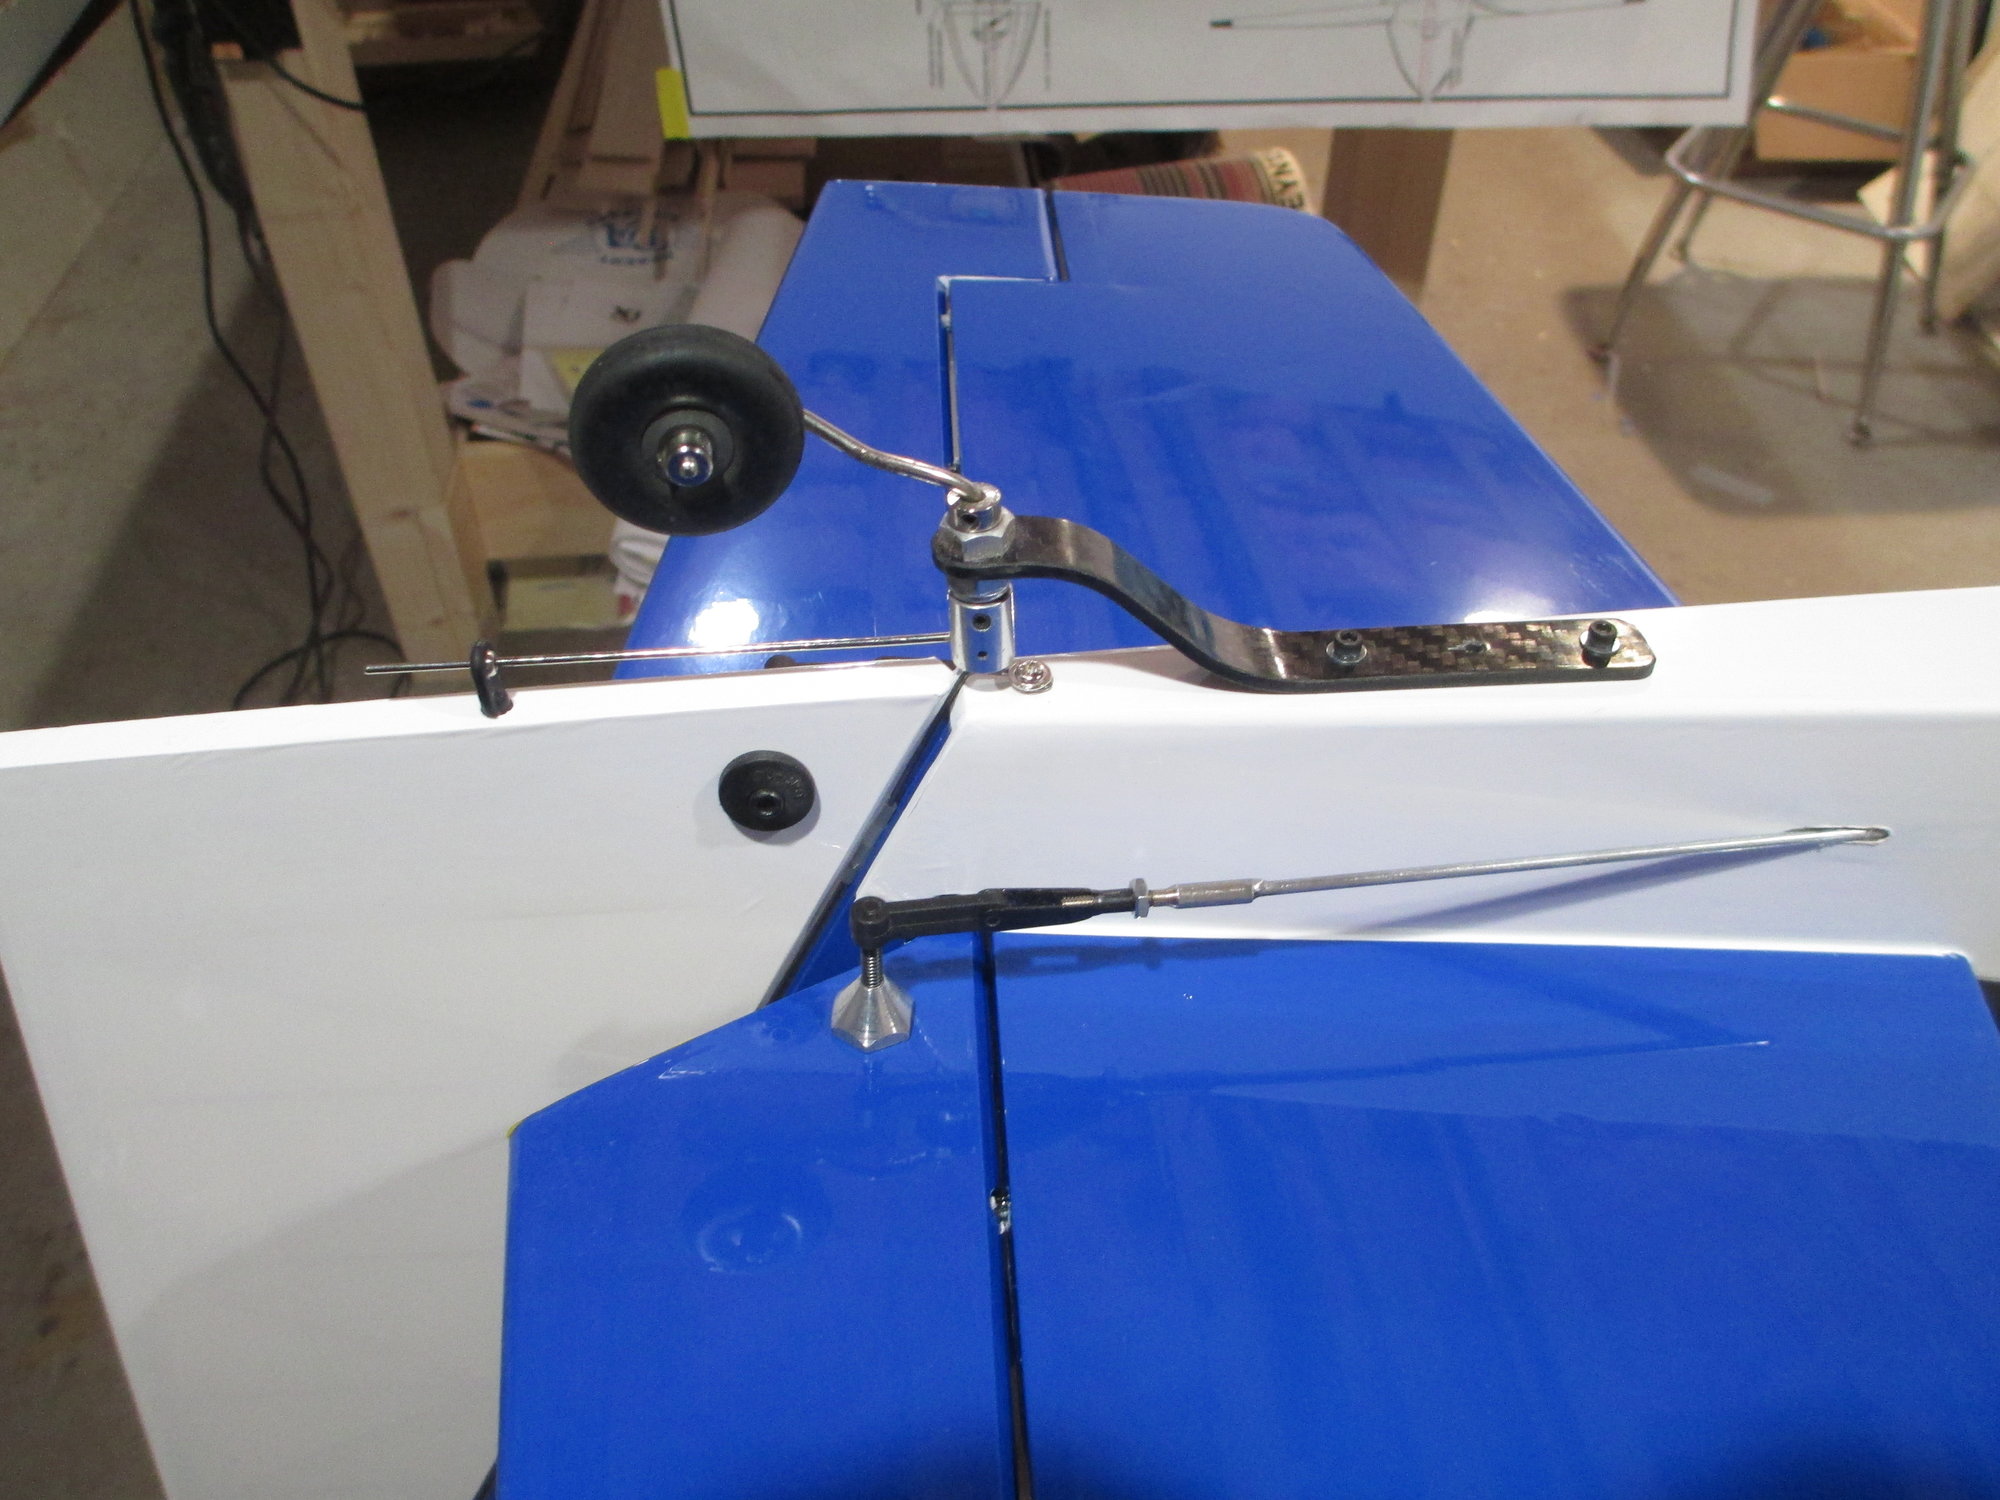
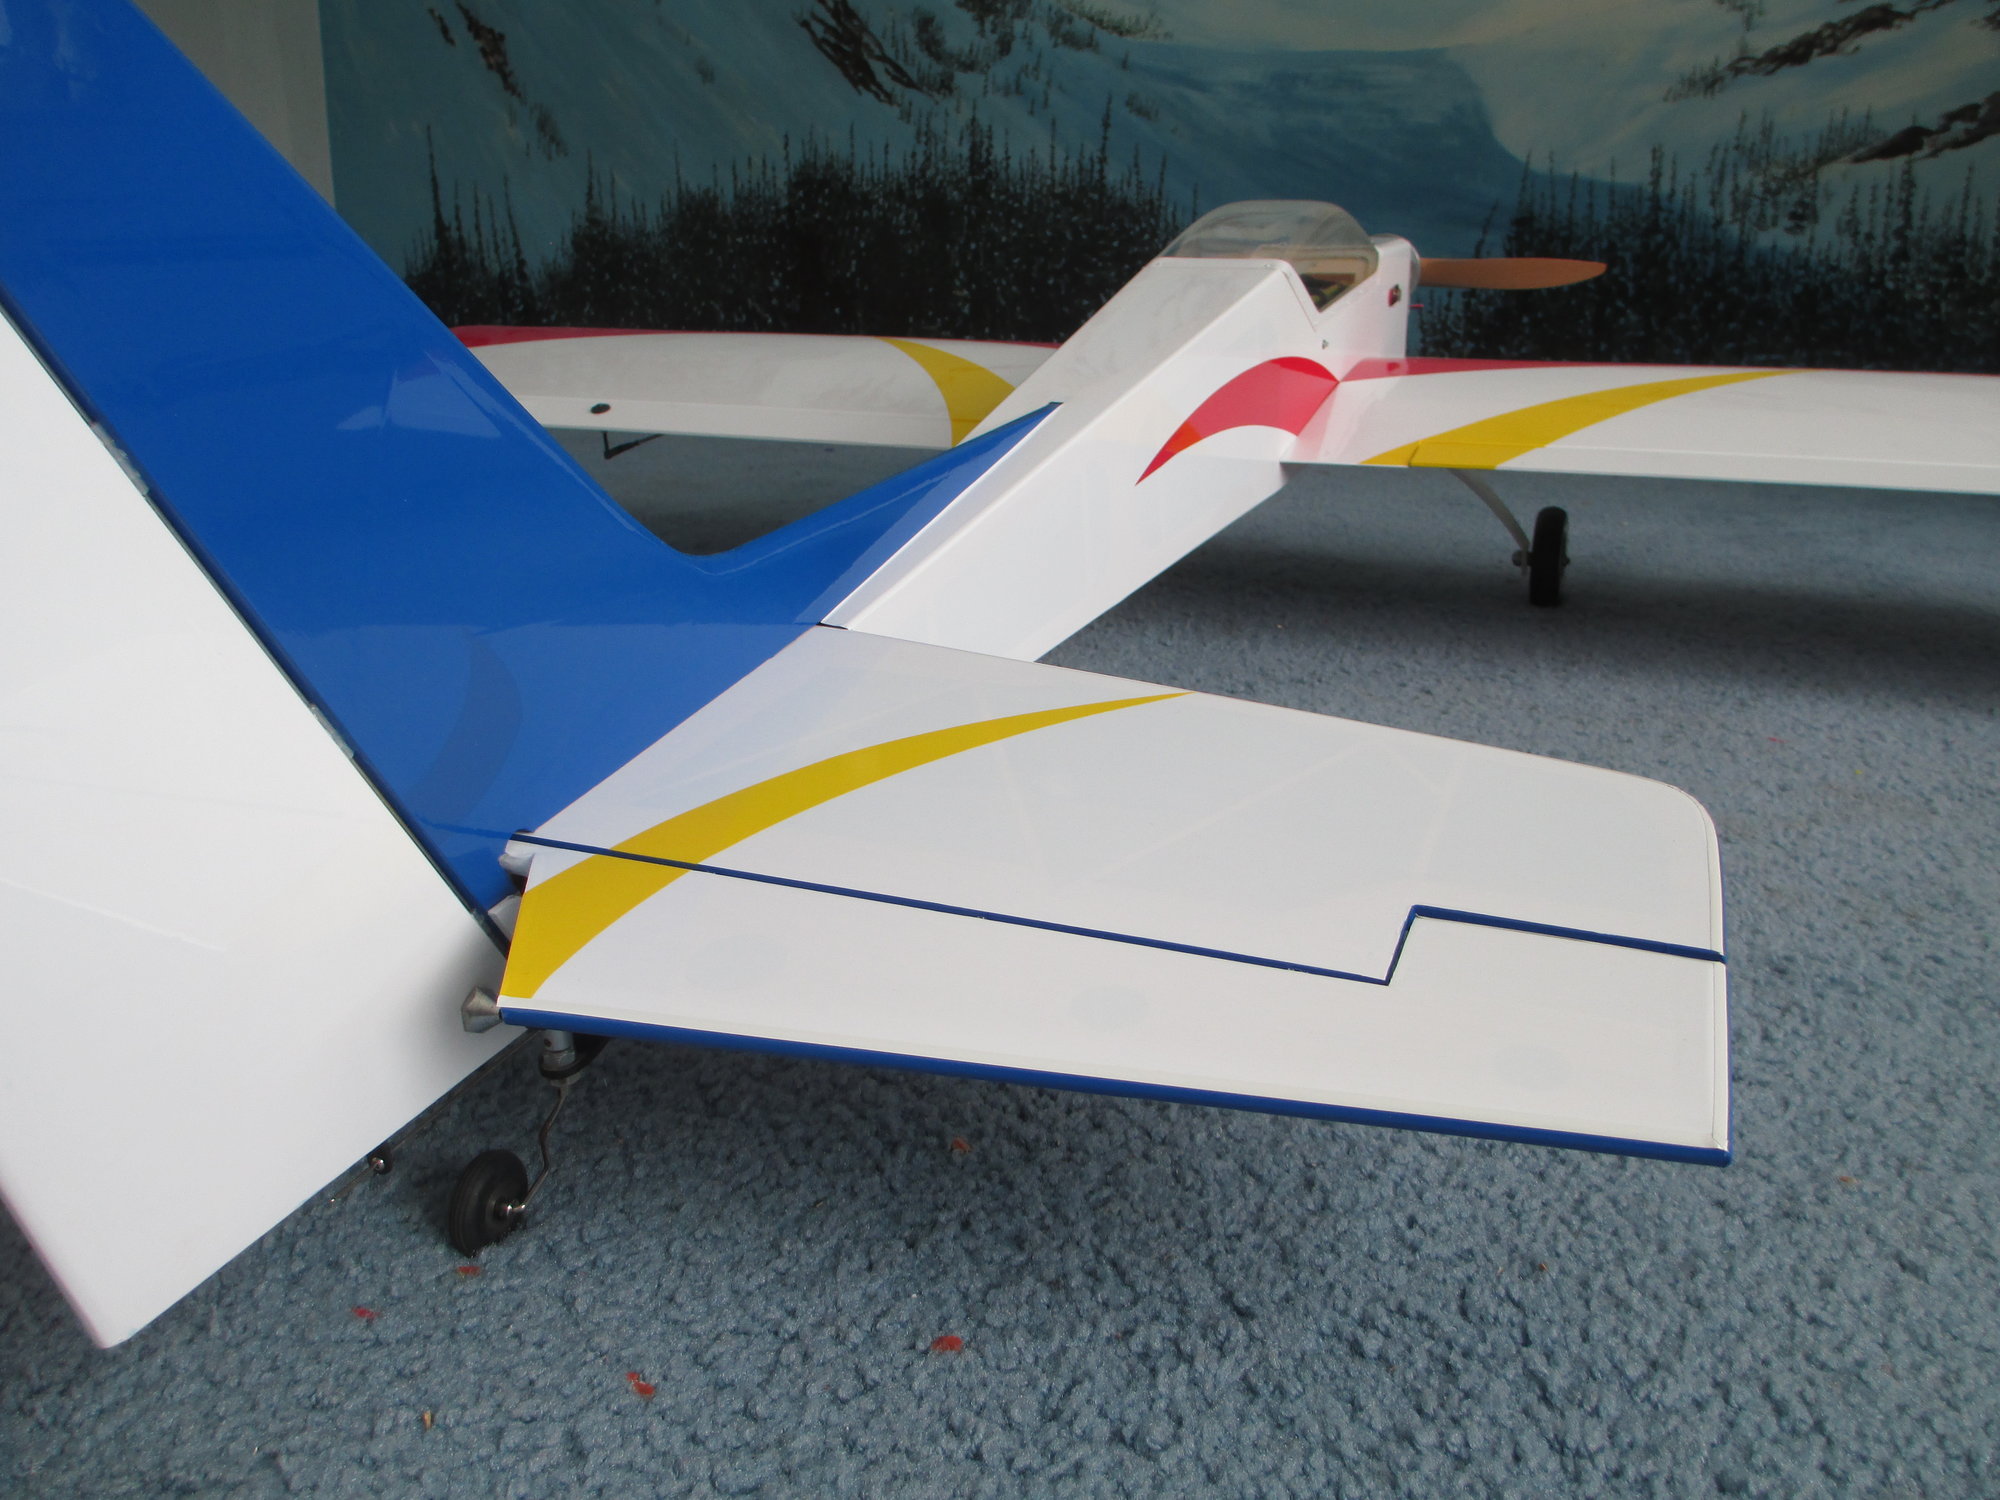
Tail wheel and tiller arm.
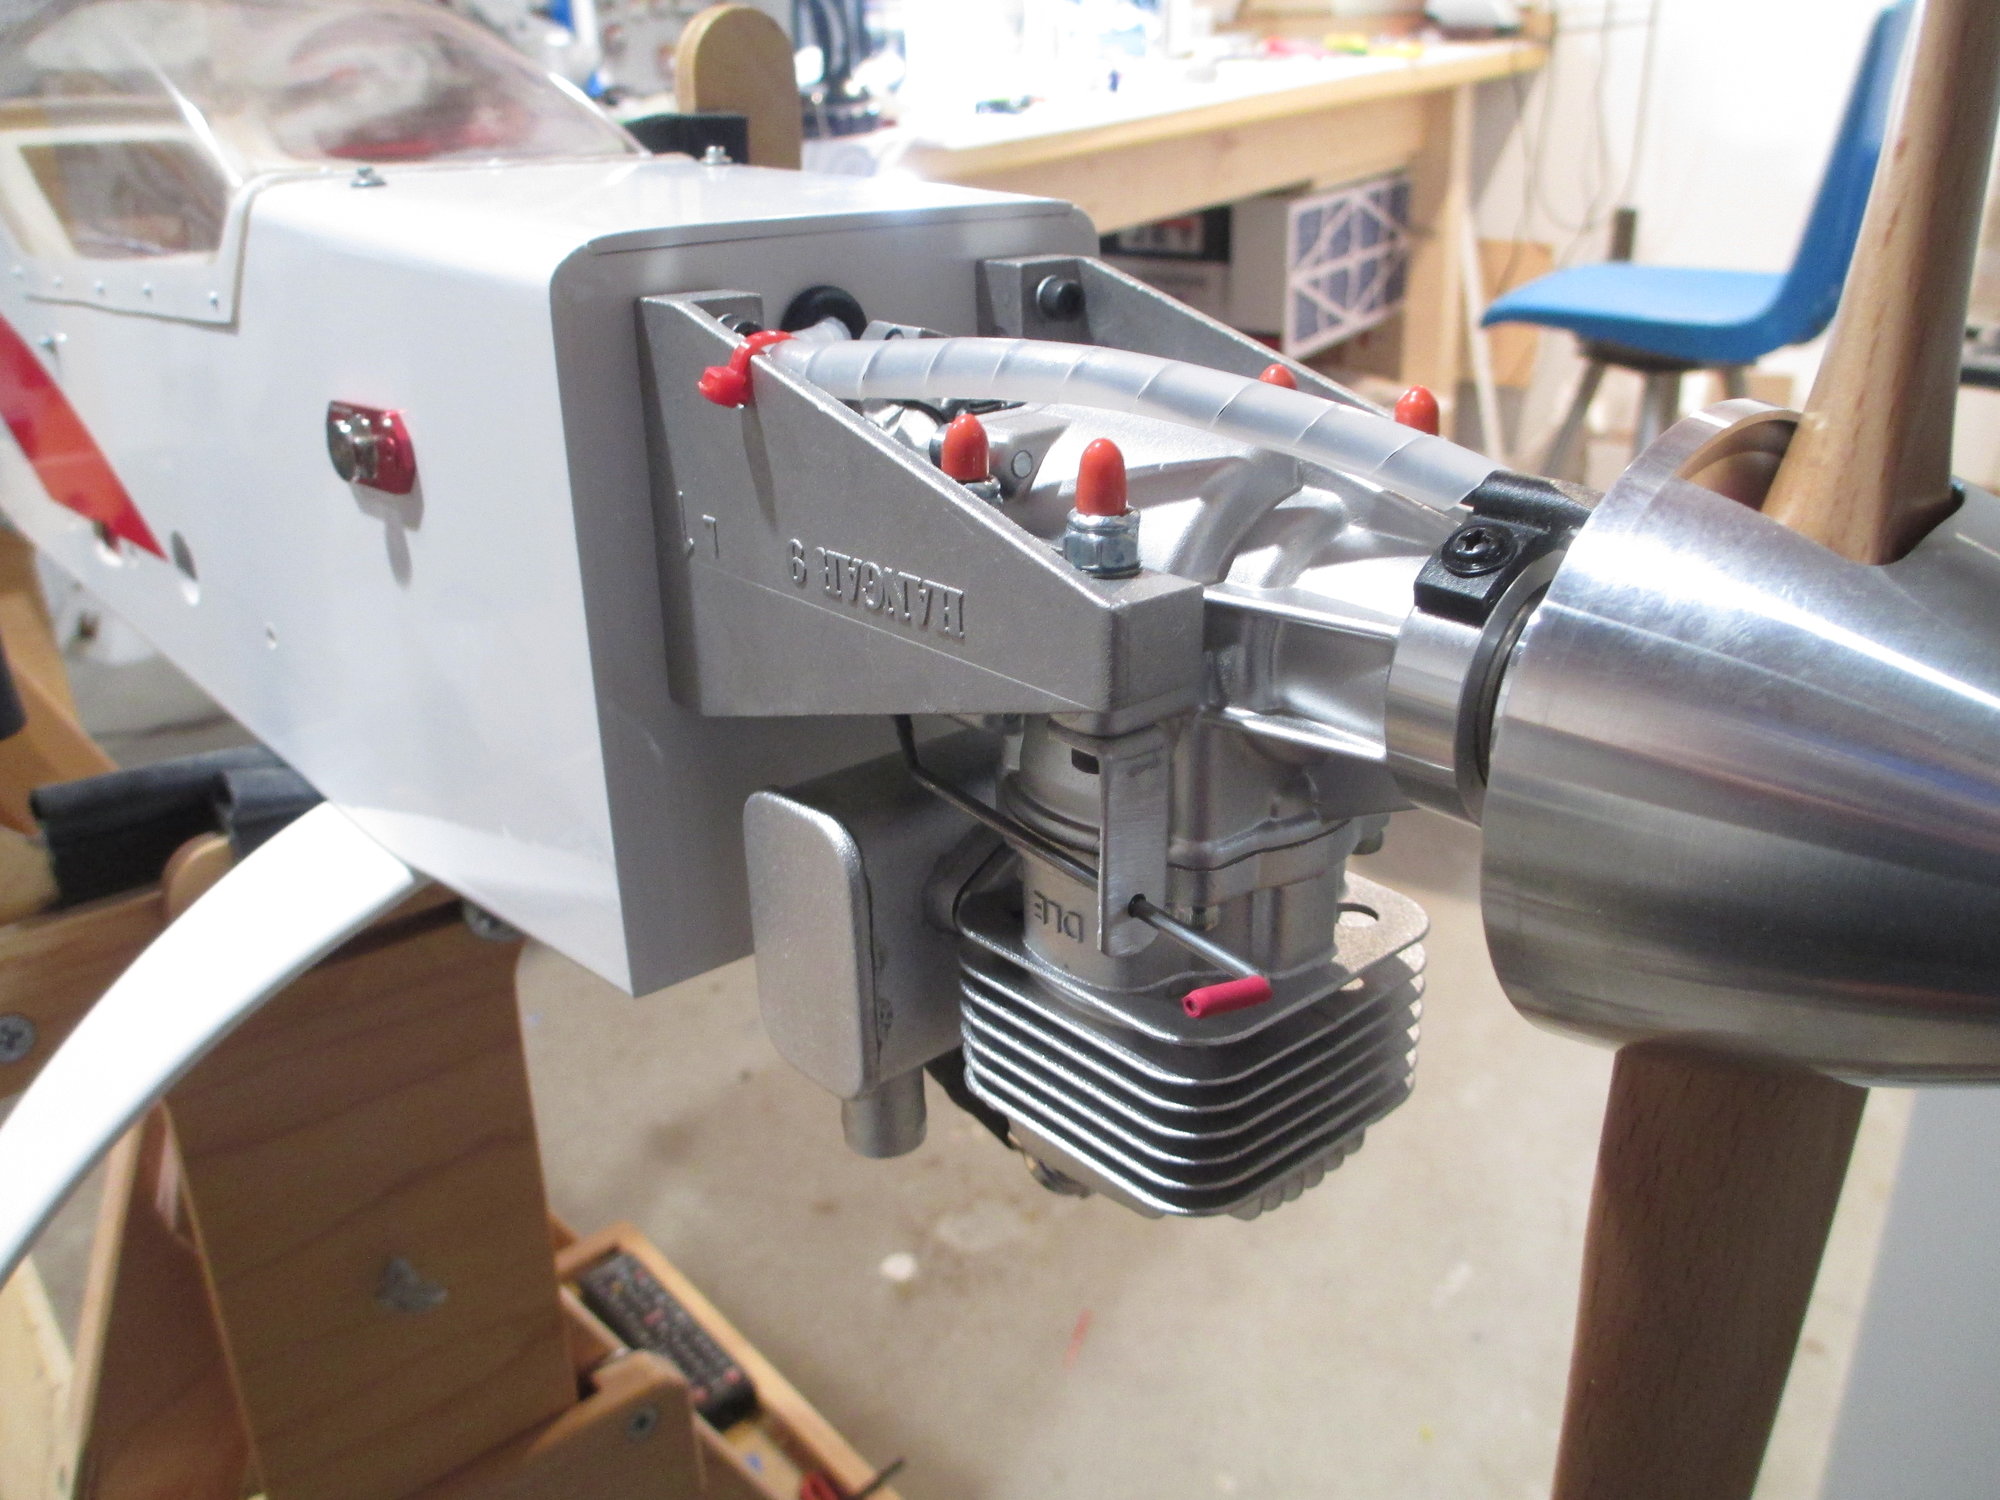
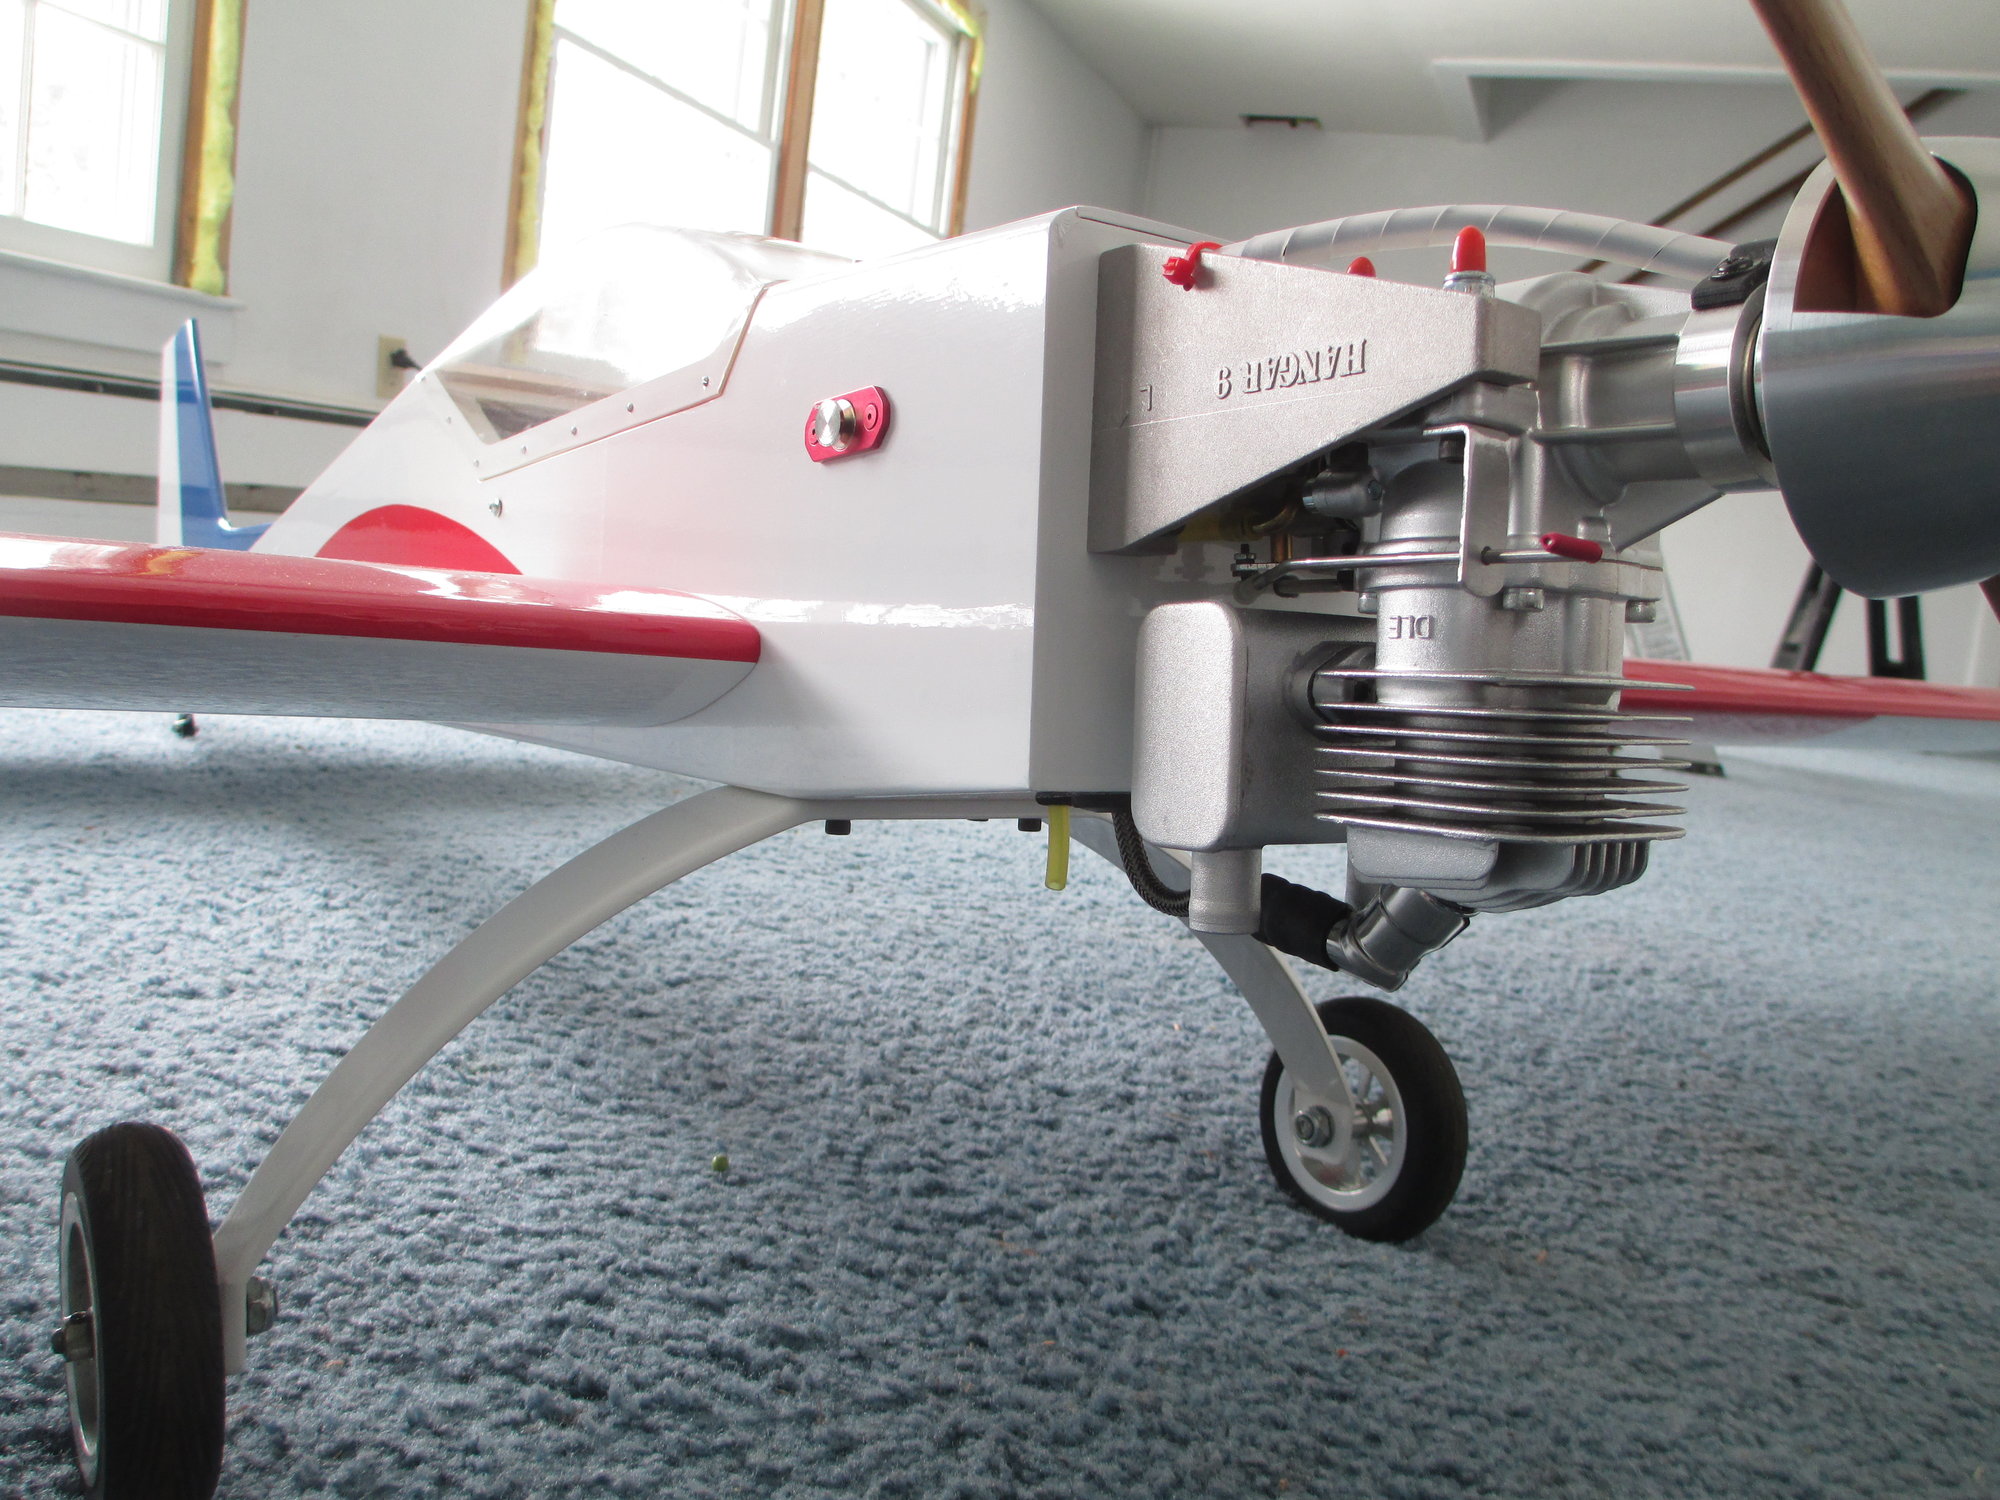
DLE-20RA engine fits very well. You can also see the manual choke bracket that I made.
Better angle to see the choke linkage and bracket. 4-40 rod was used for the linkage.
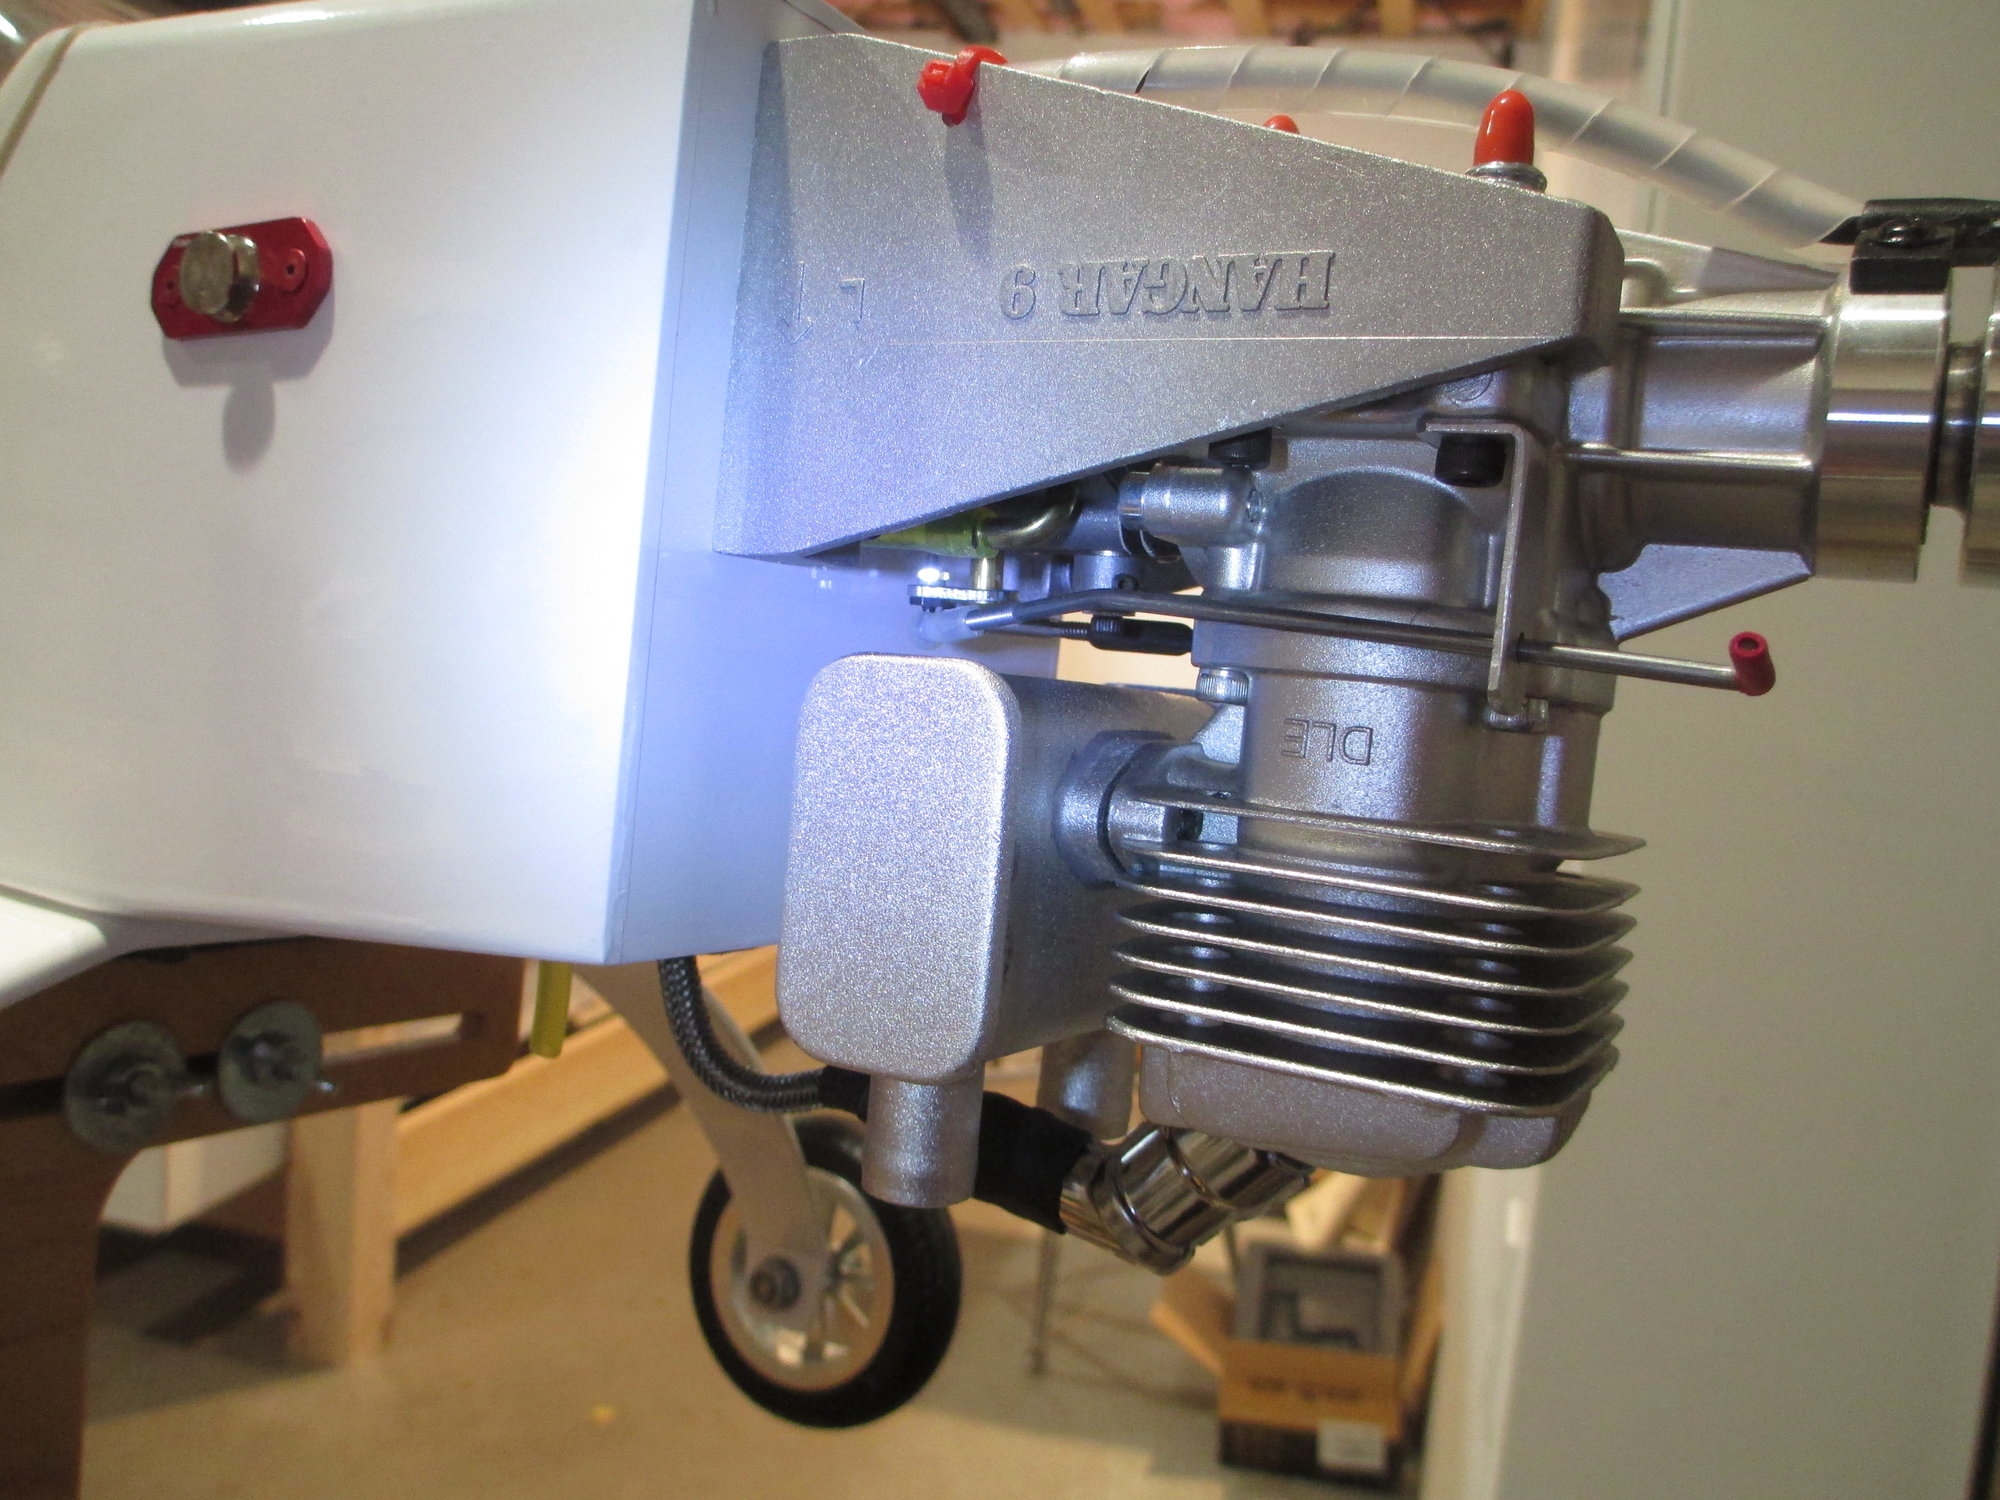
View of the vent tube exit and how well the spark plug cable fits. Notice the rubber grommet used to prevent any chafing of the braided wire.
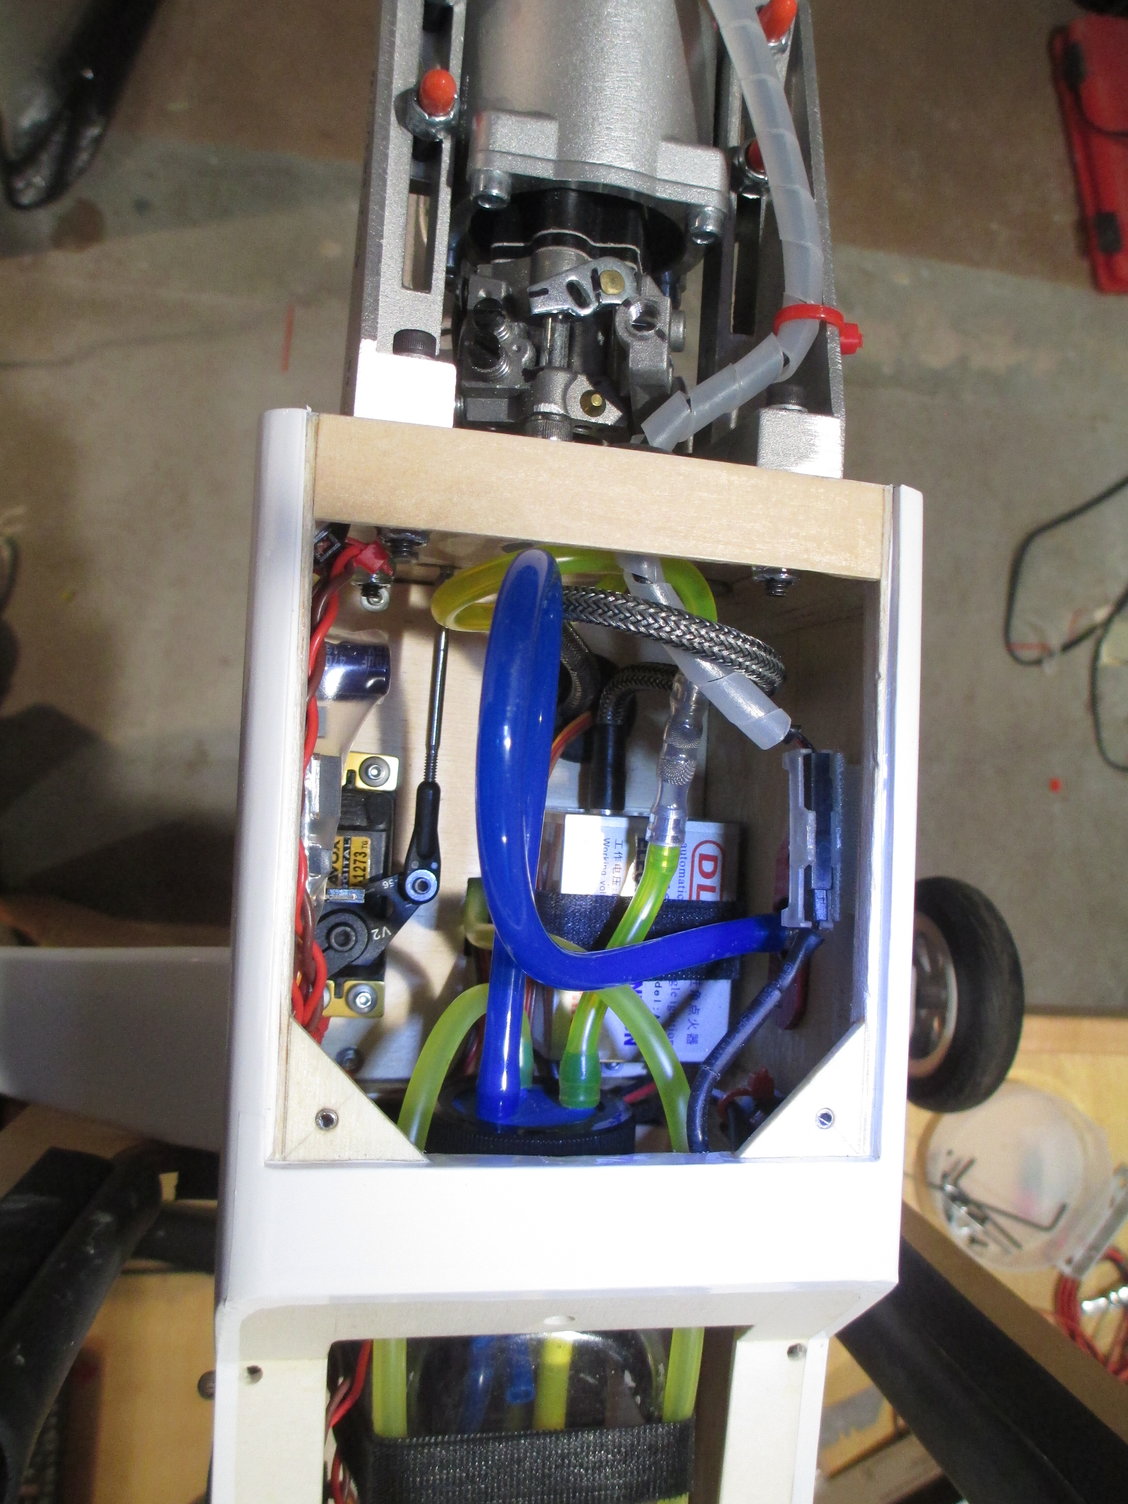
Inside view of where the ignition module, throttle servo and IBEC are located.

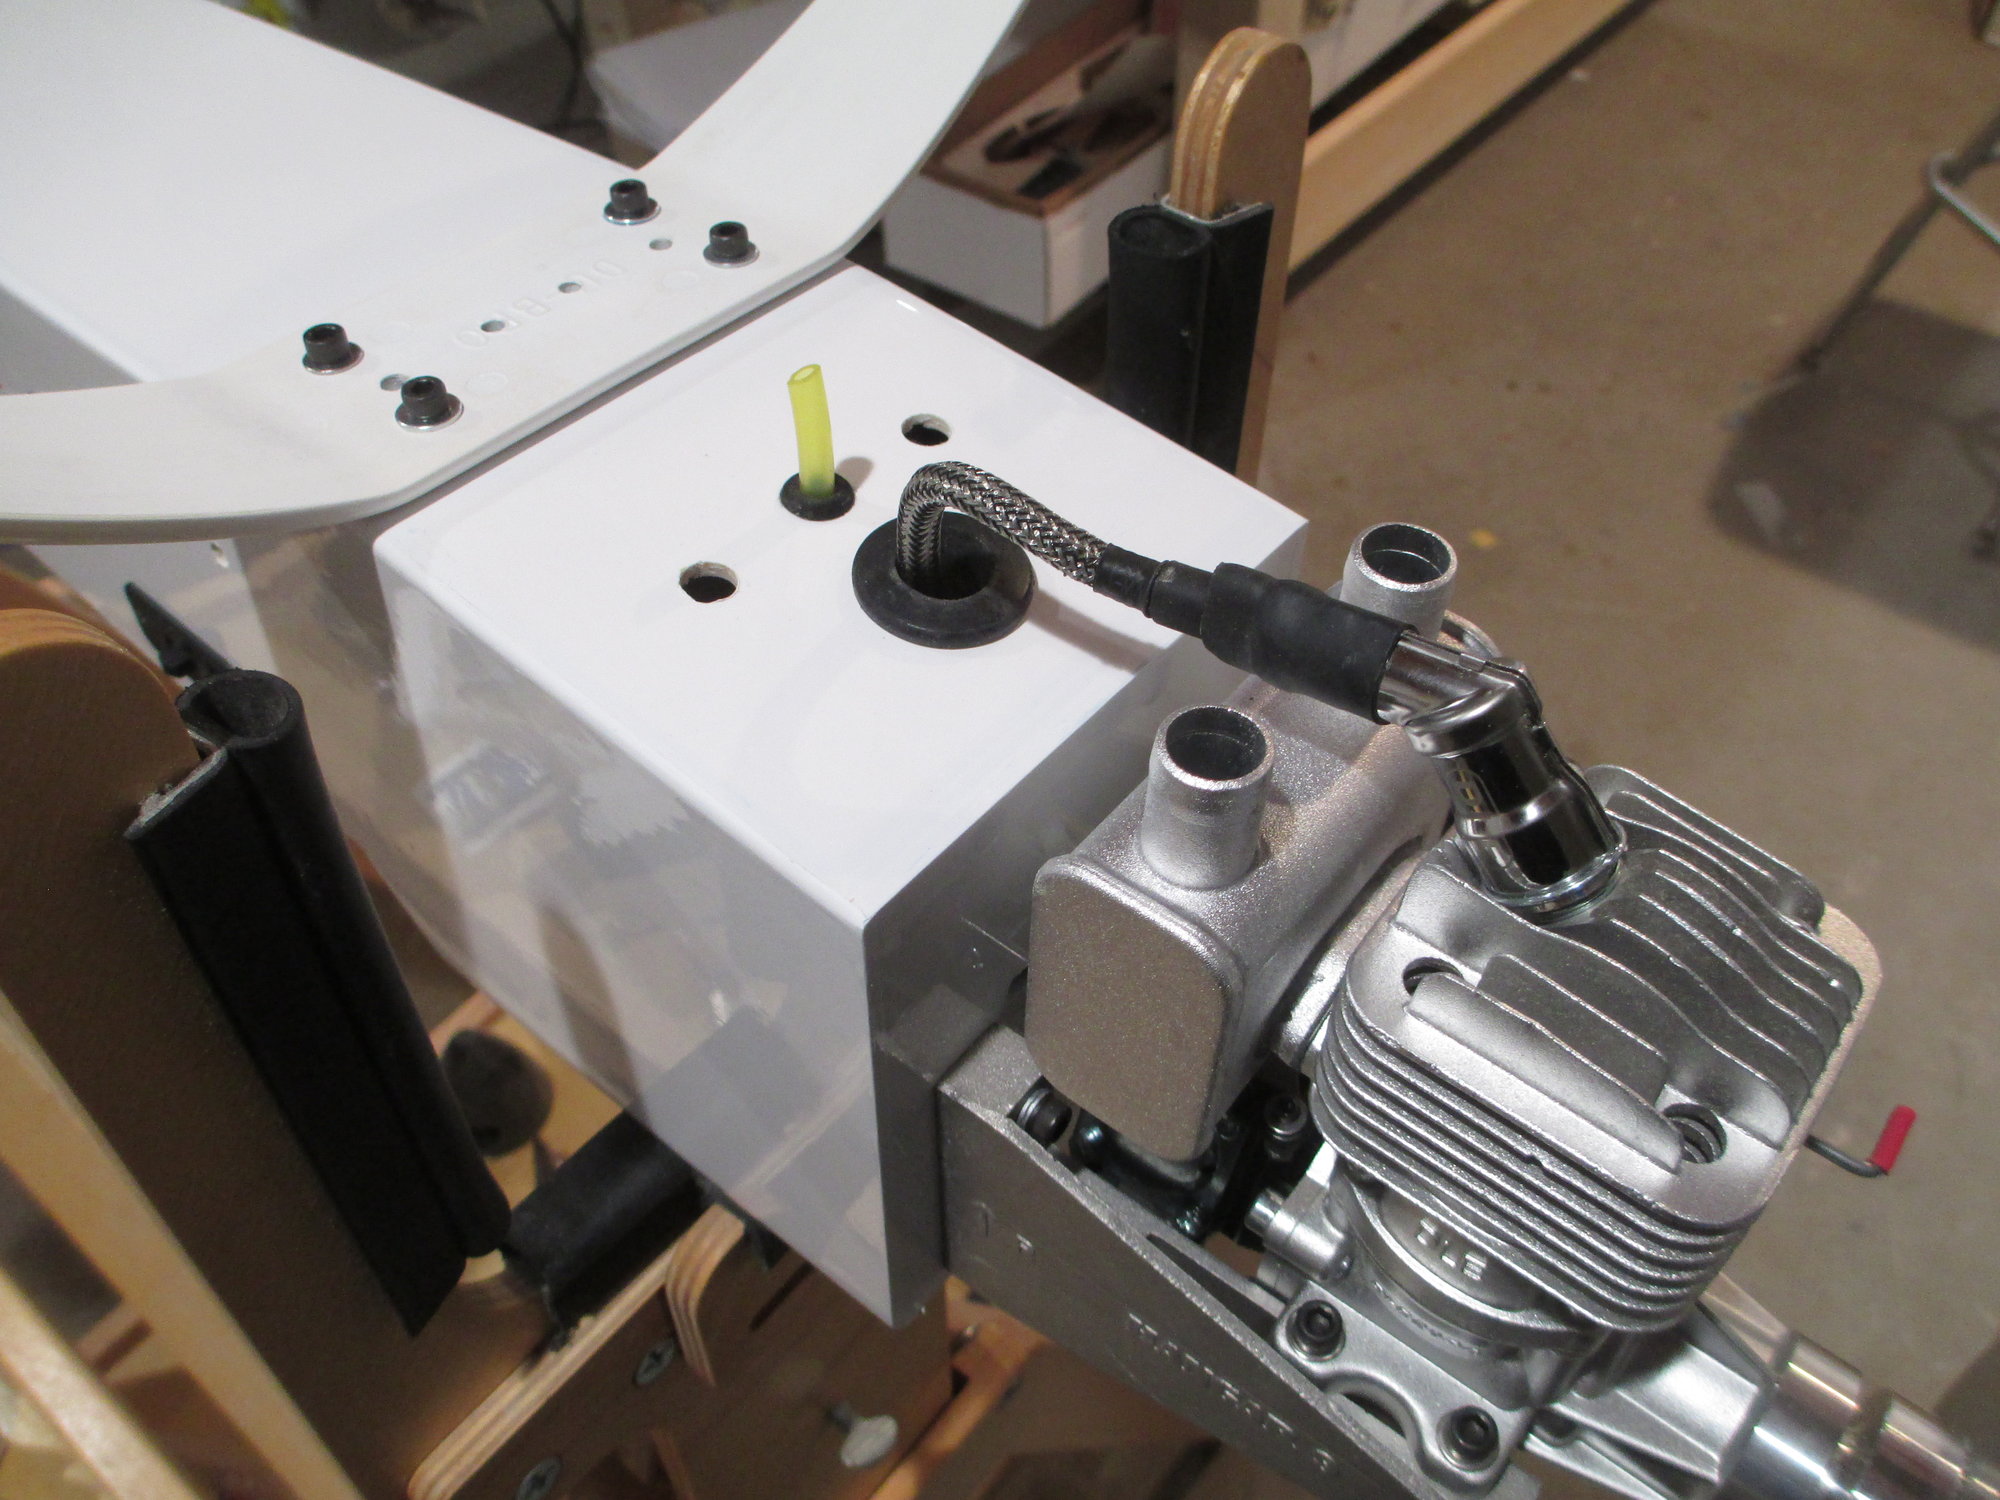
Location of the 12oz. tank completely plumbed and secured. The tank is located over the planes CG so regardless of the tank's volume of fuel, its CG won't change. The tank is secured to its mount by the two hook and loop straps seen and another section of hook and loop tape secured from the base to the tank. No need for foam as the hook and loop tape does a good job absorbing shock and vibration.
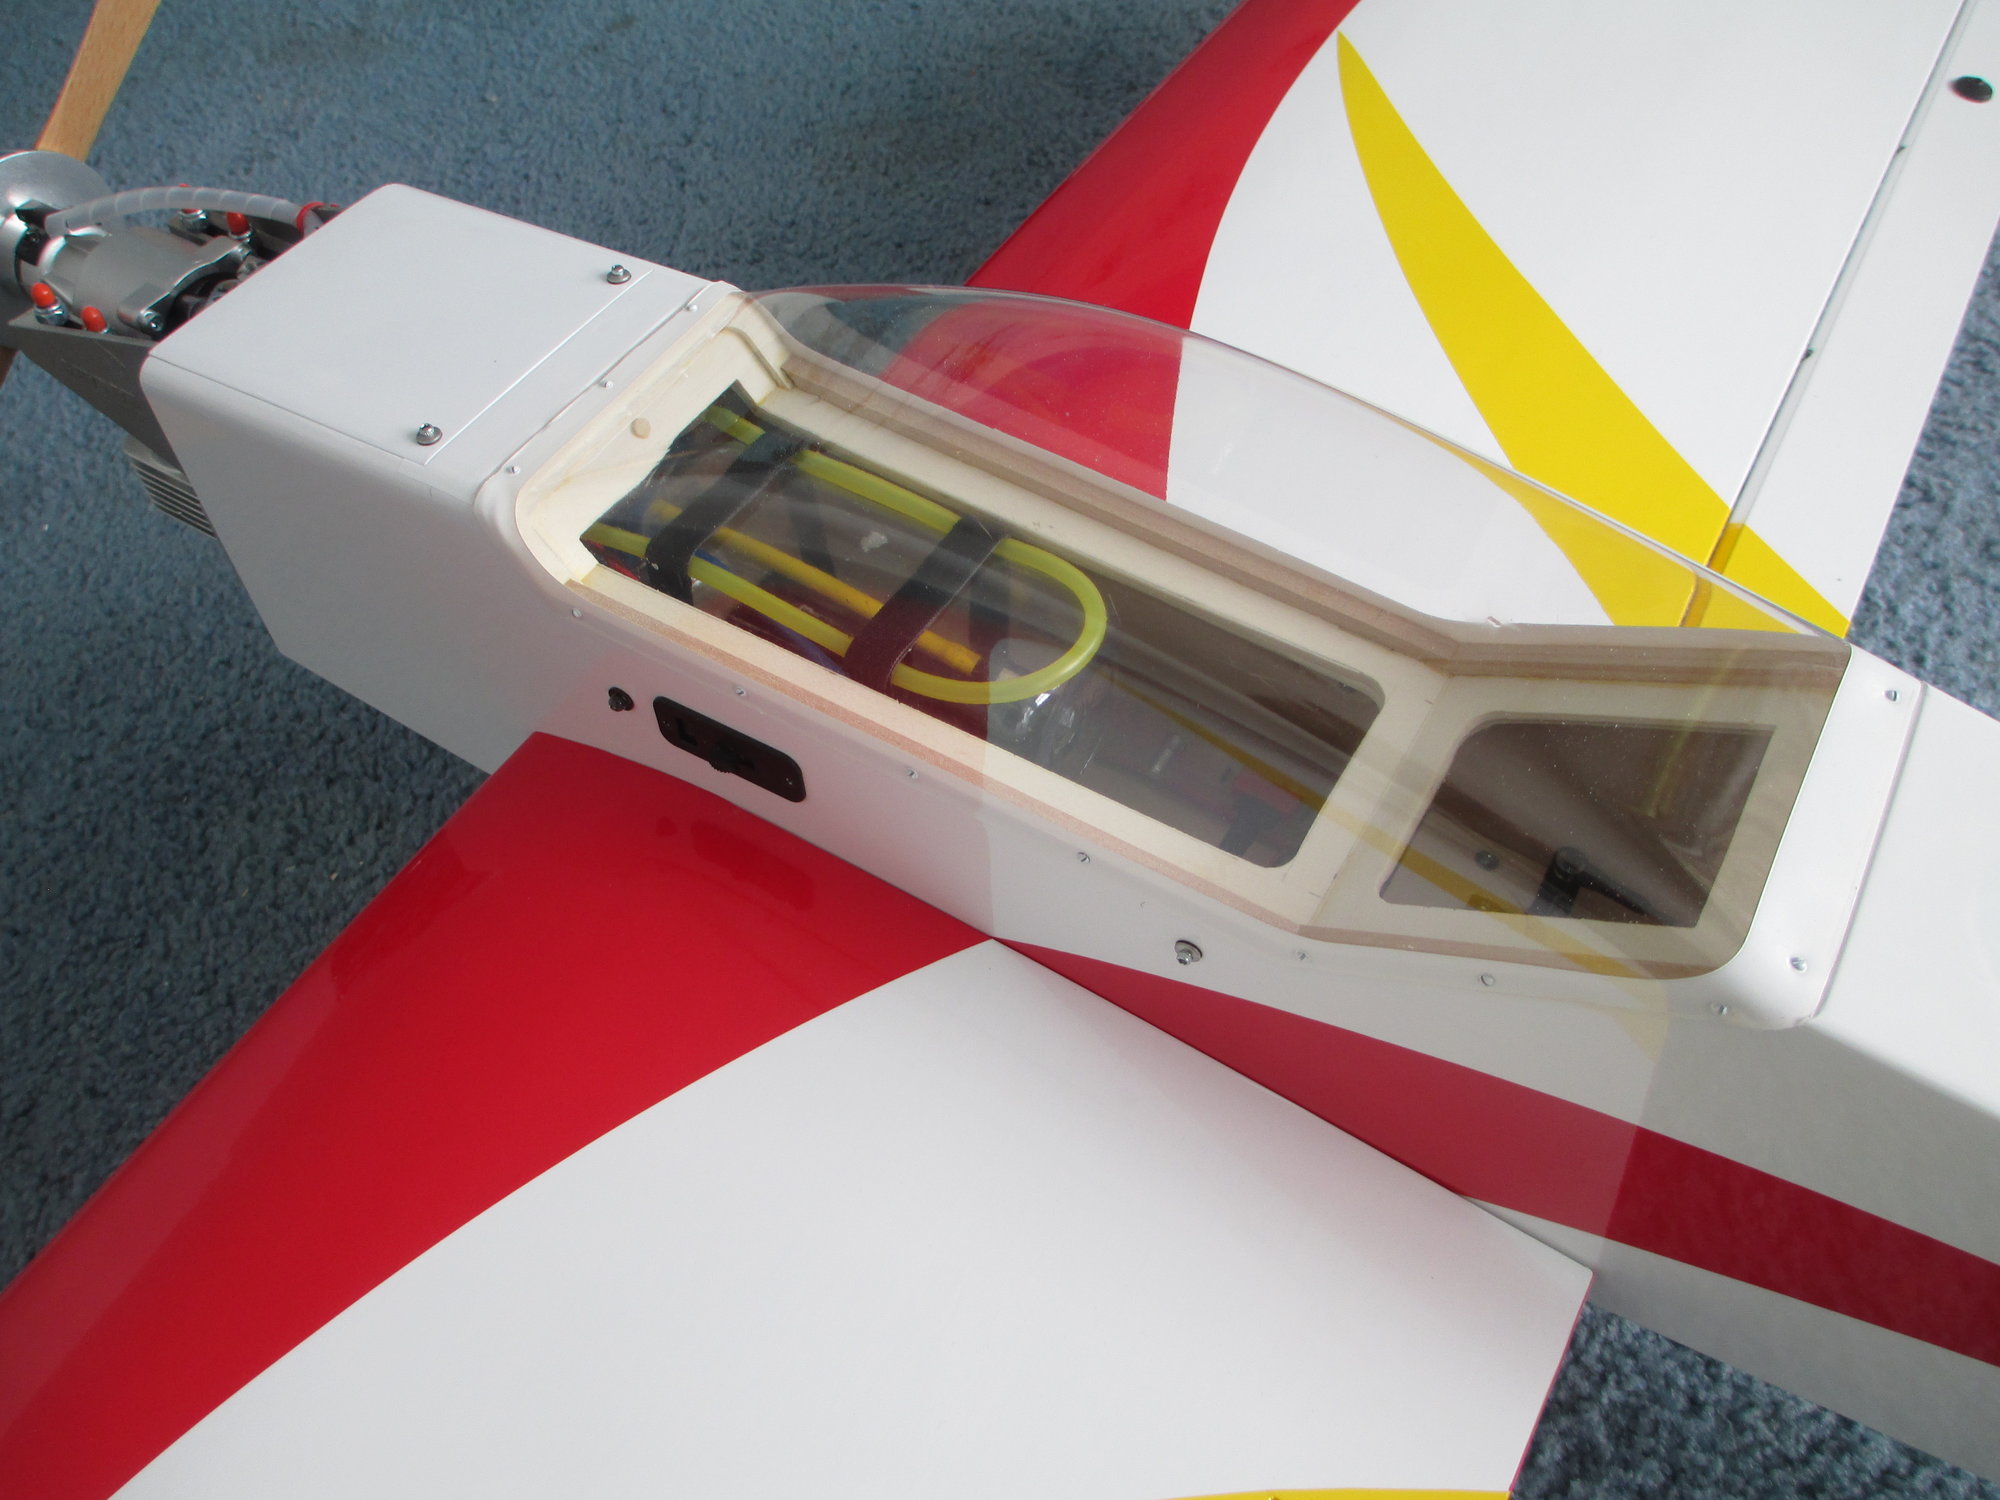
Very easy to monitor the fuel in the tank just by looking through the canopy.
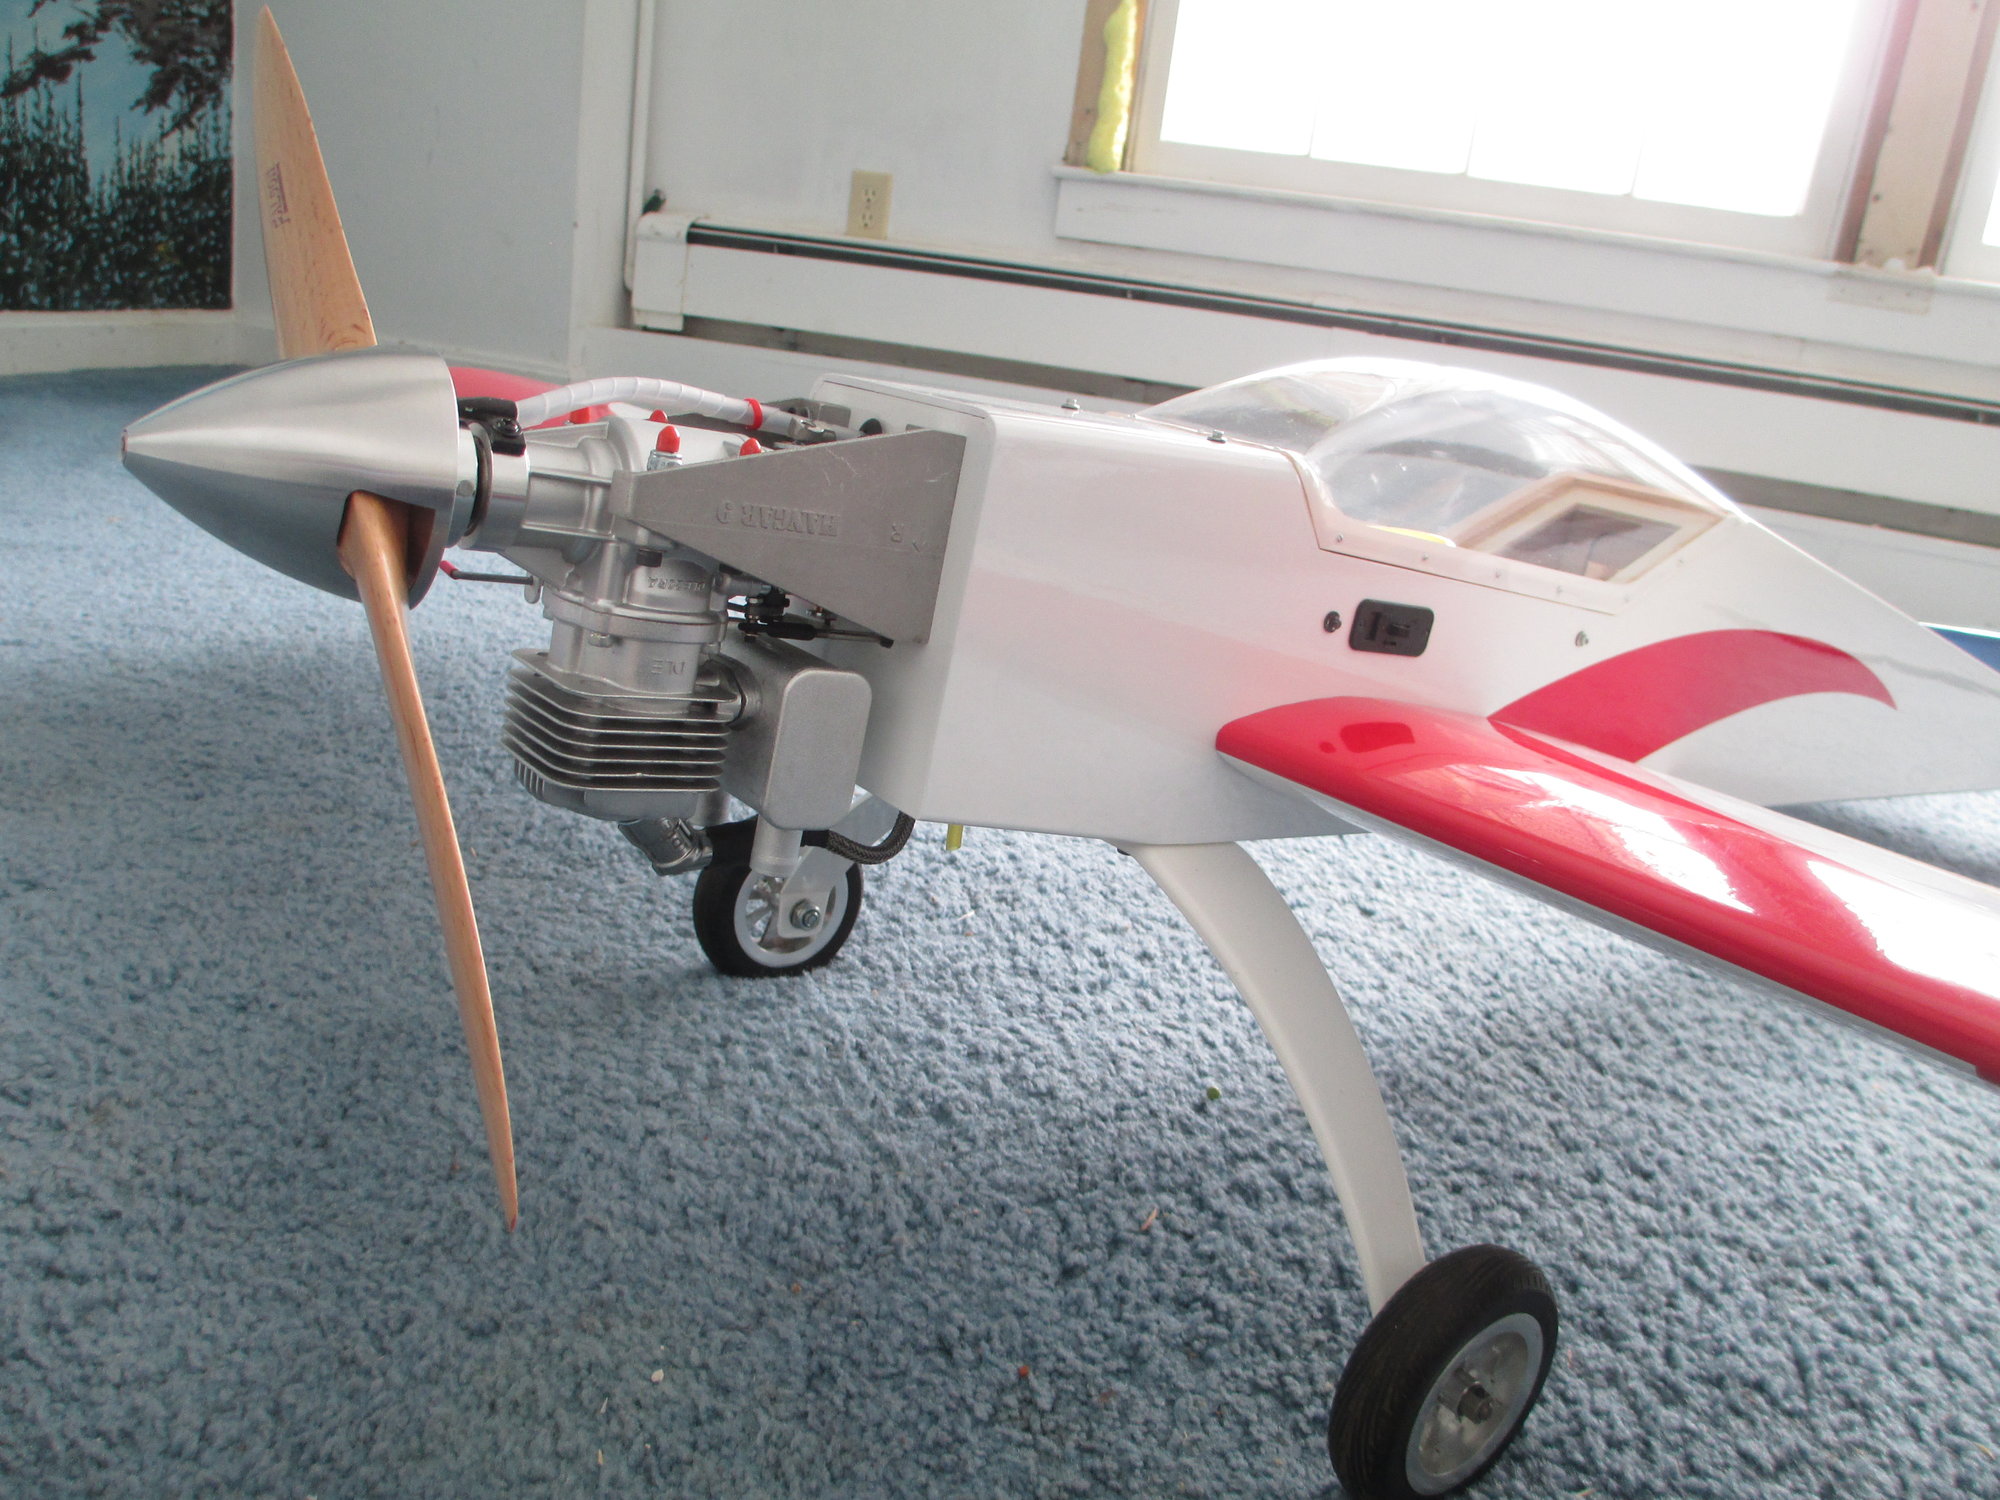
Plenty of ground clearance between the Falcon 16x8 prop and ground.

This Tiger is sporting 3-1/2 in wheels.

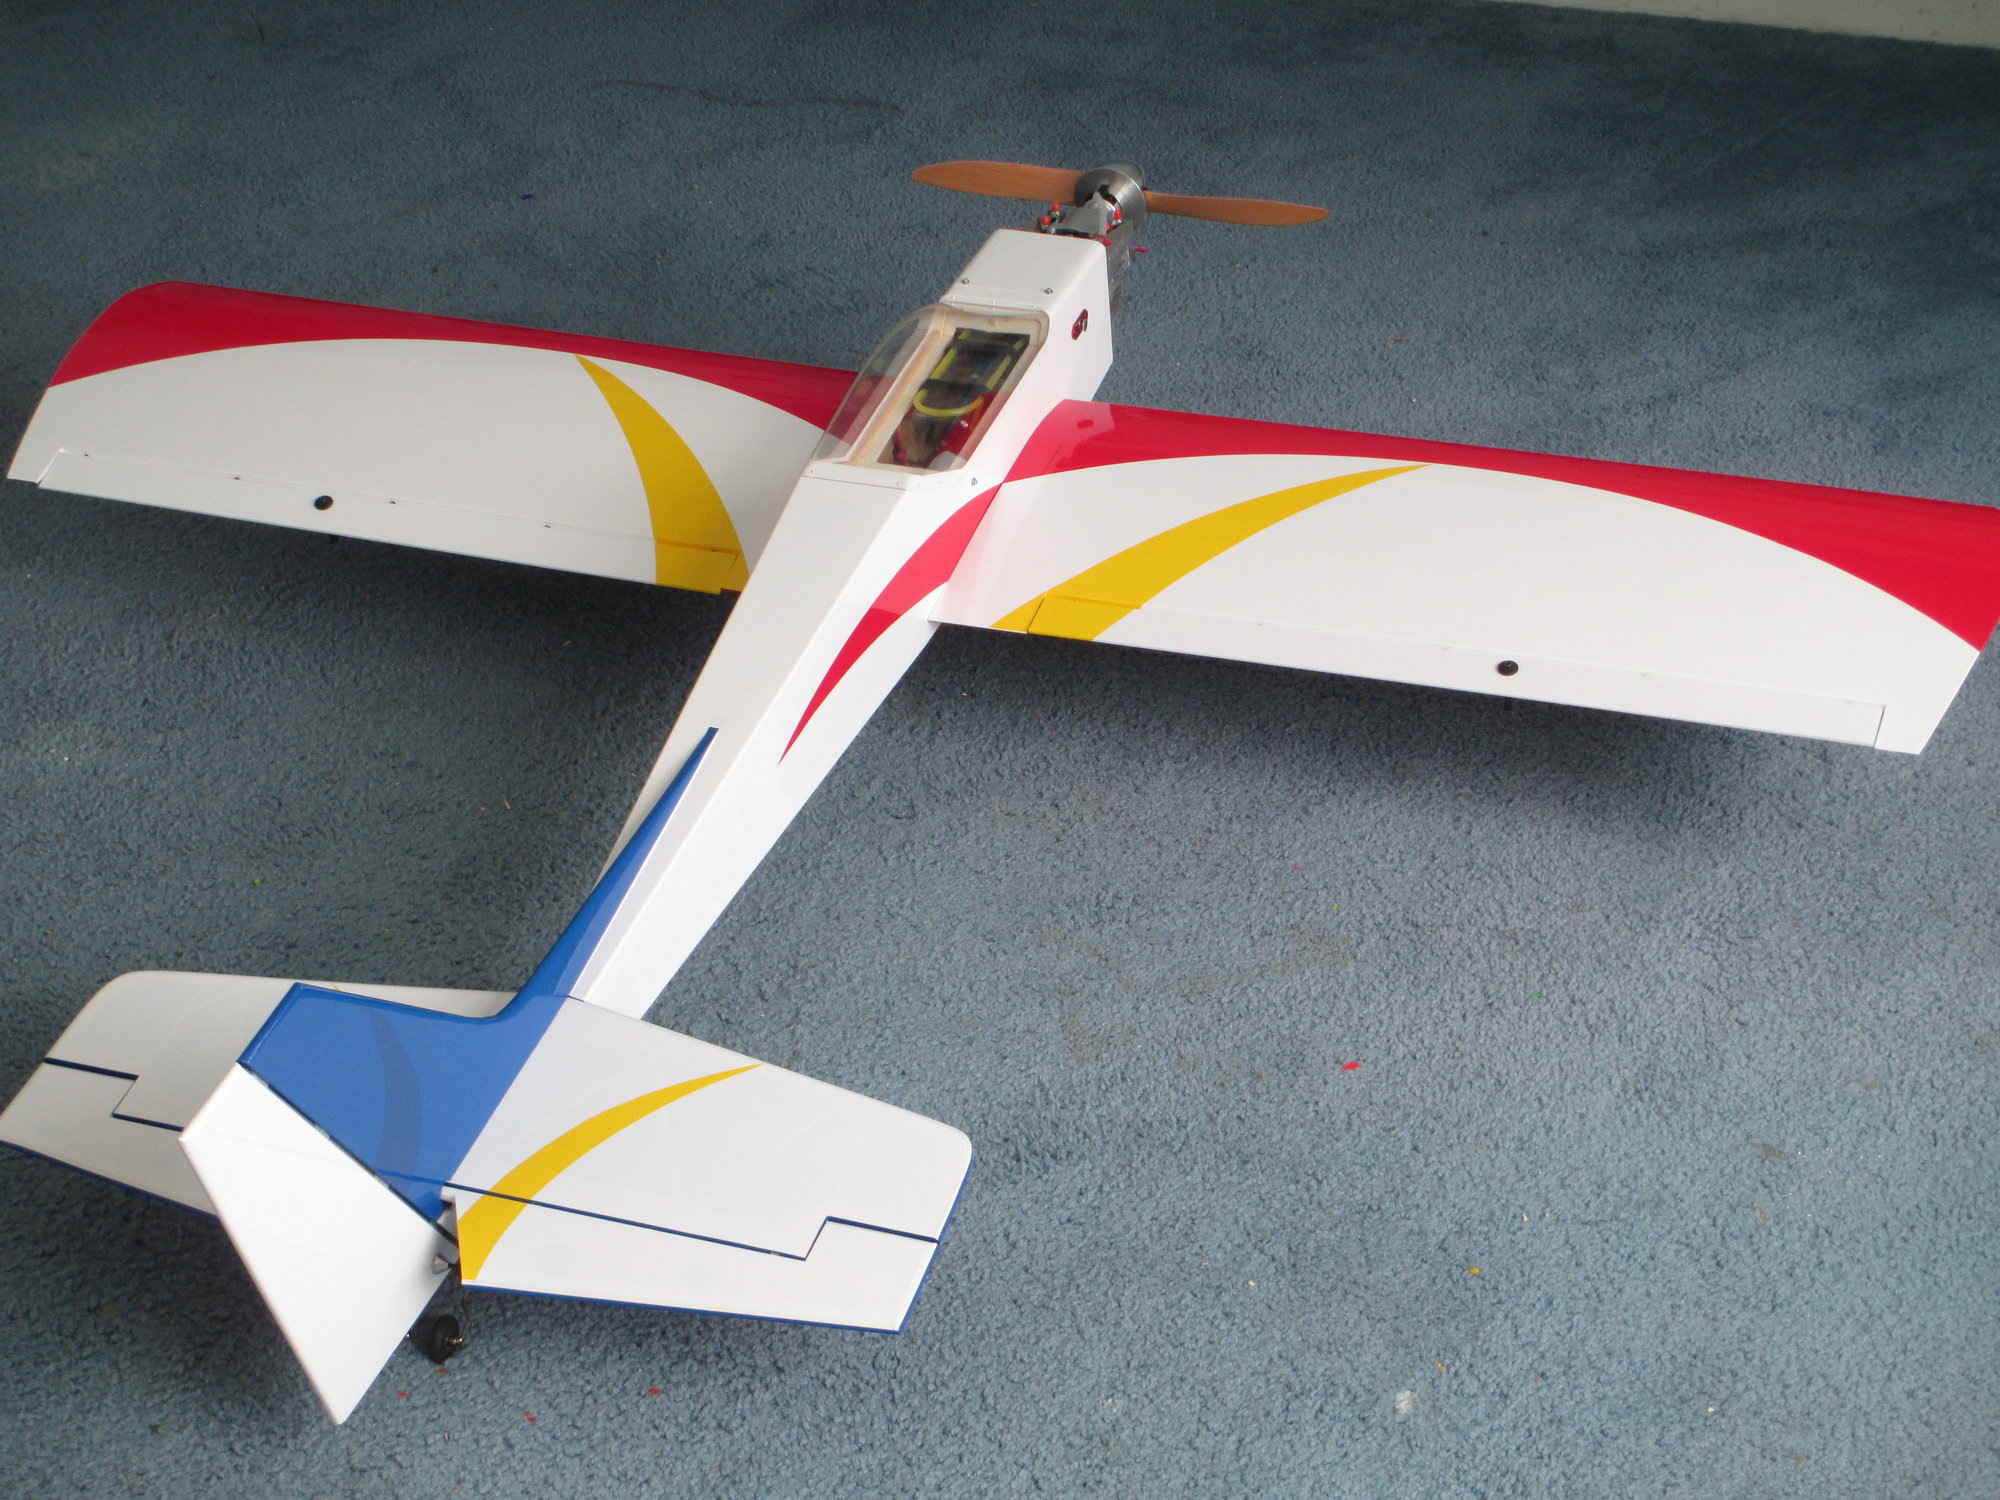
Good top view of my Tiger.
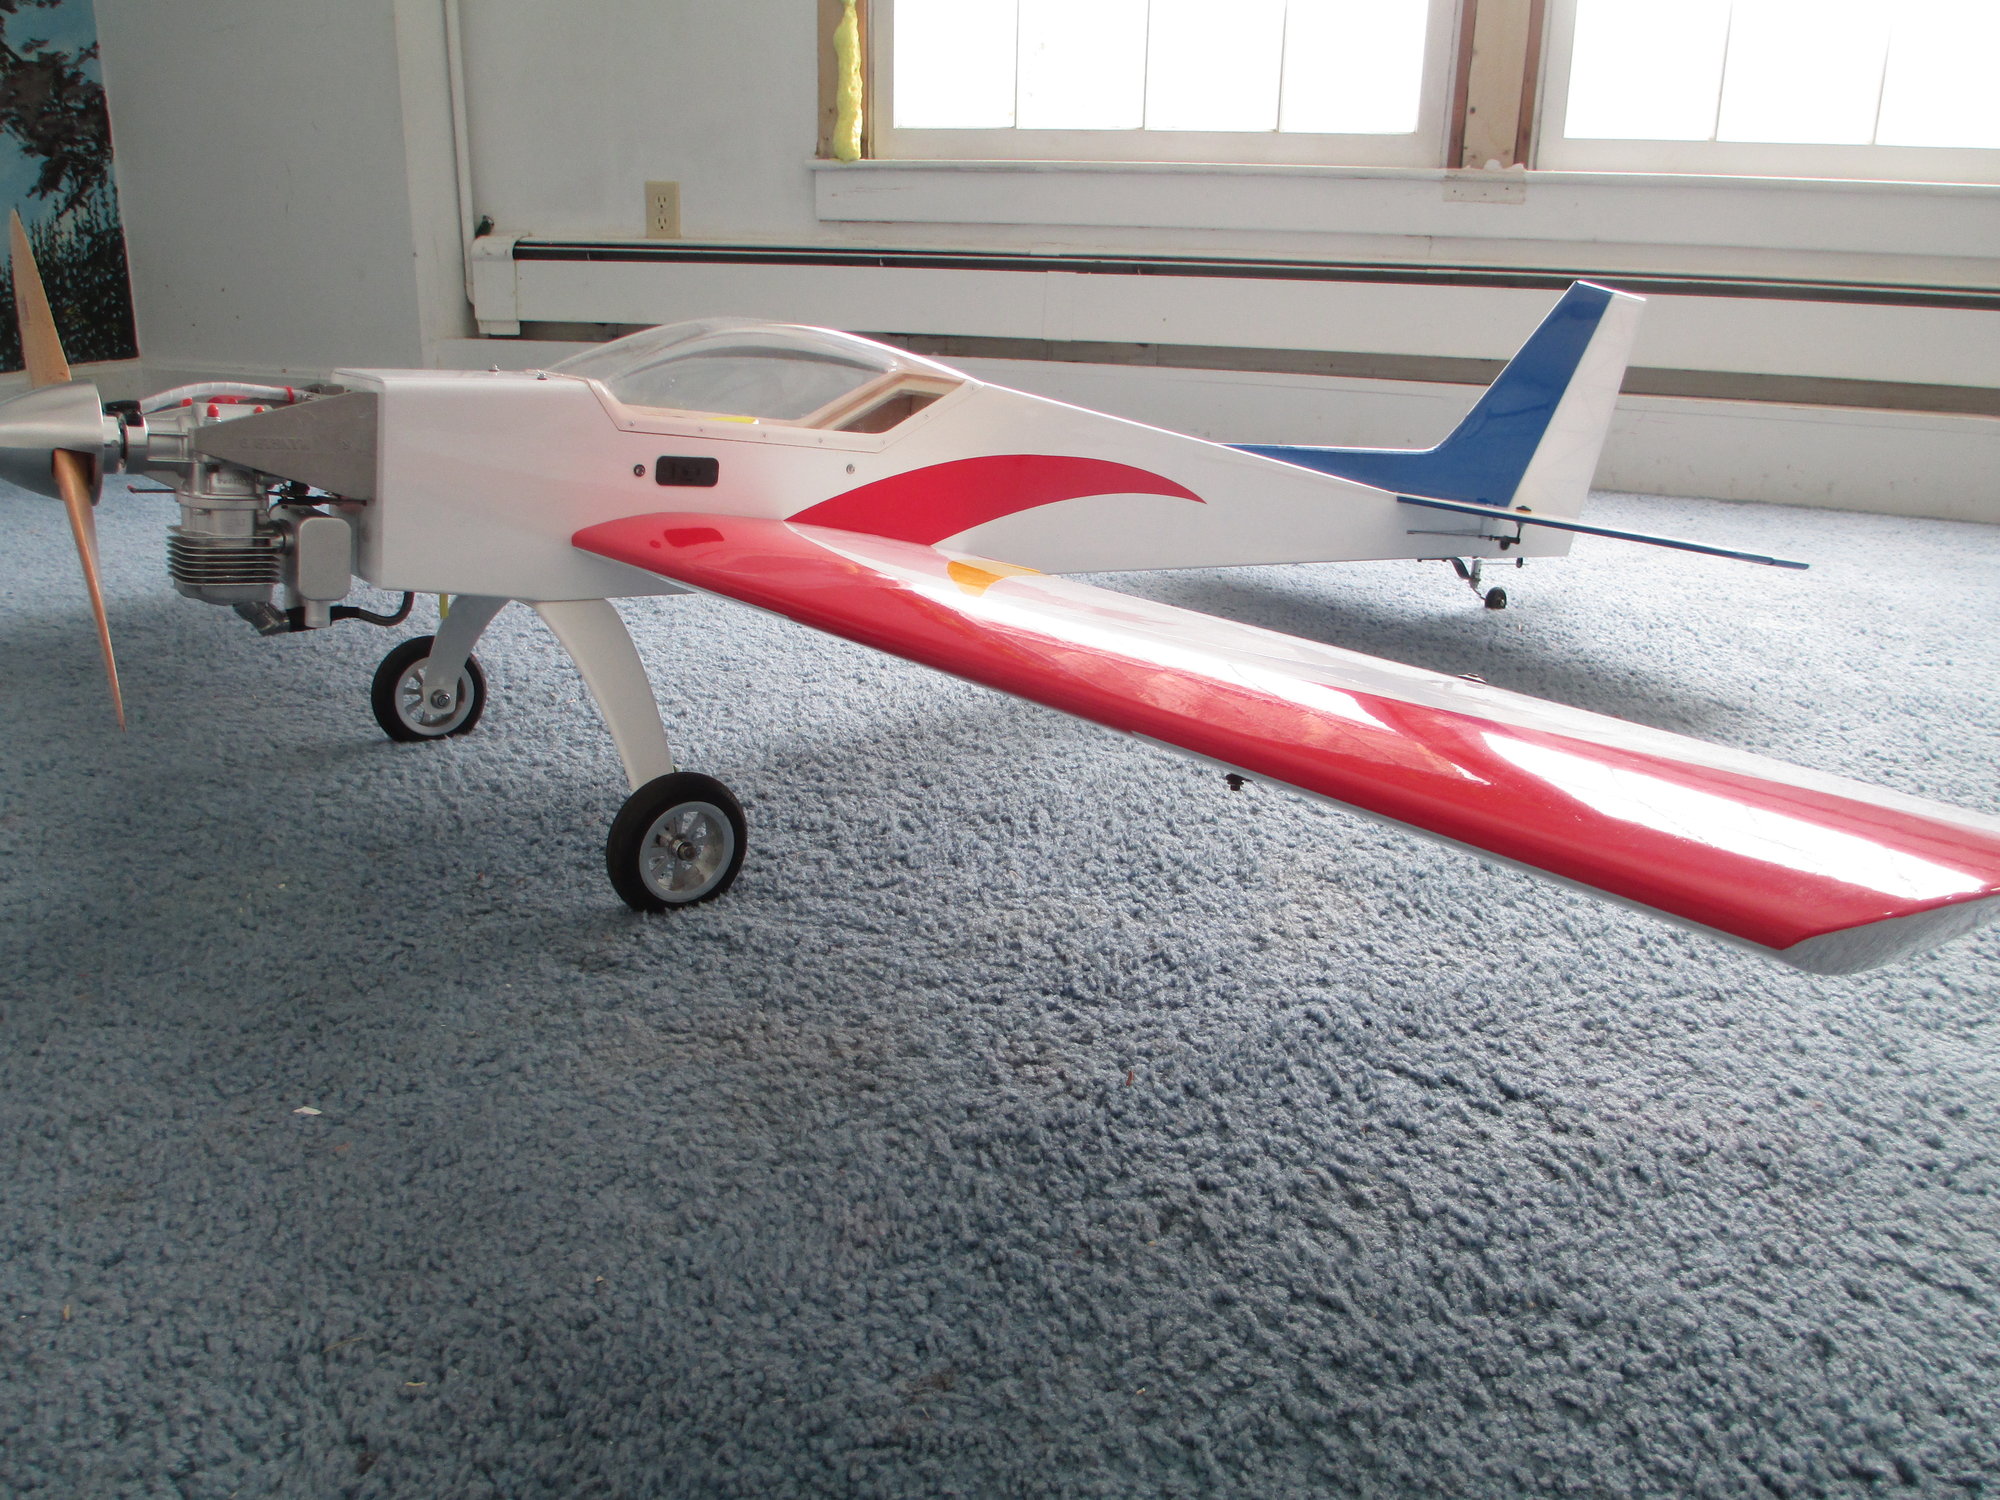
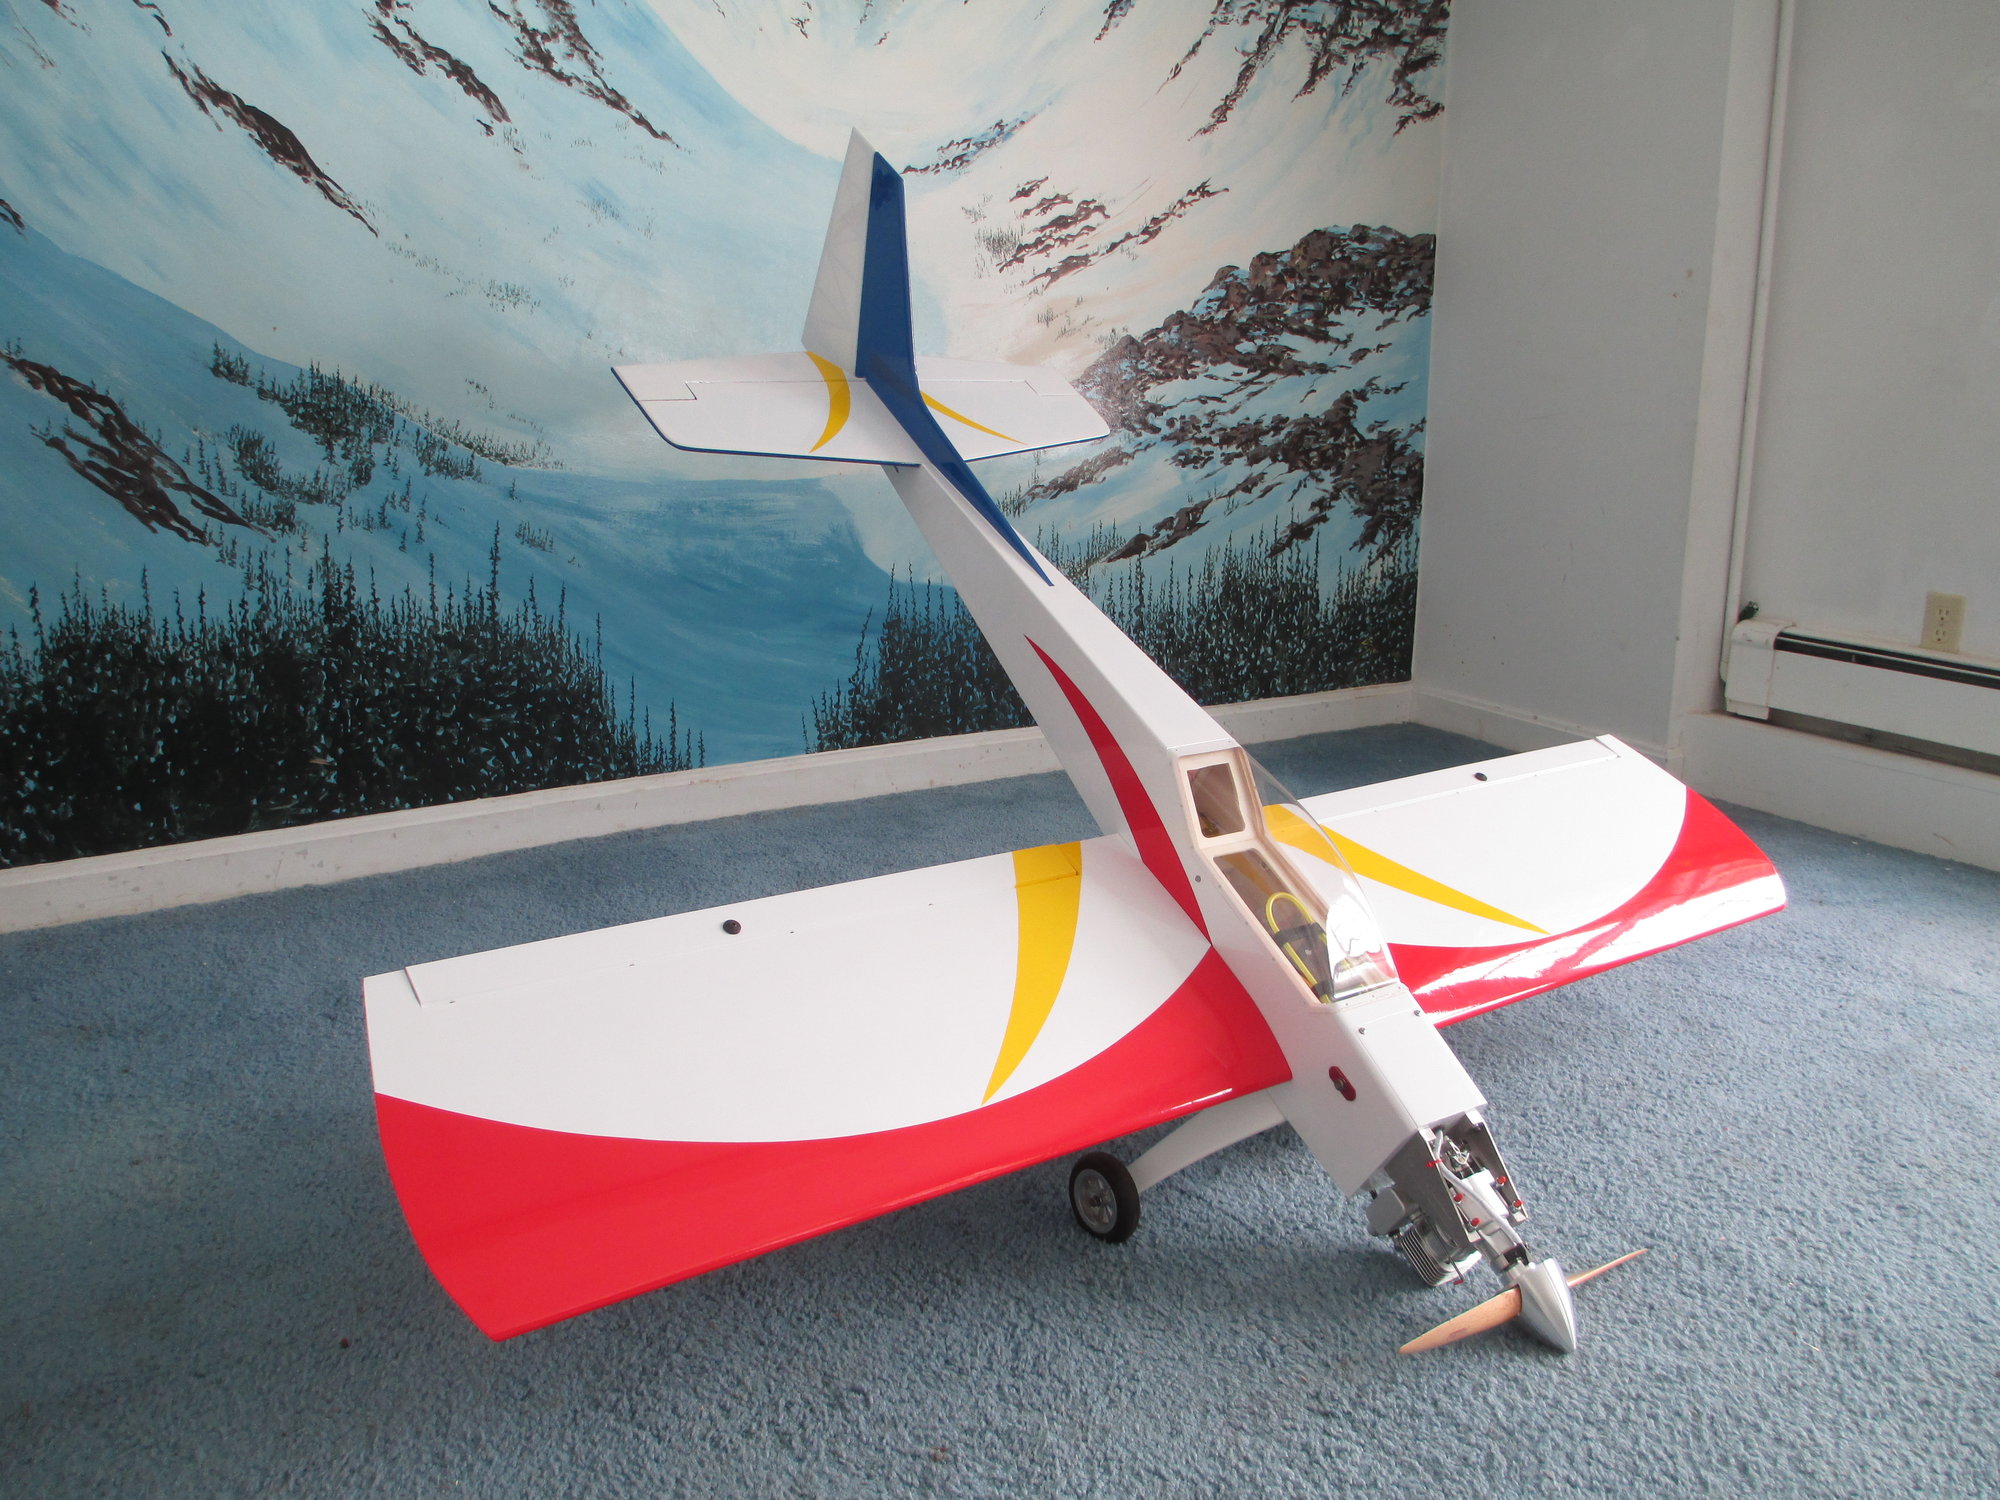
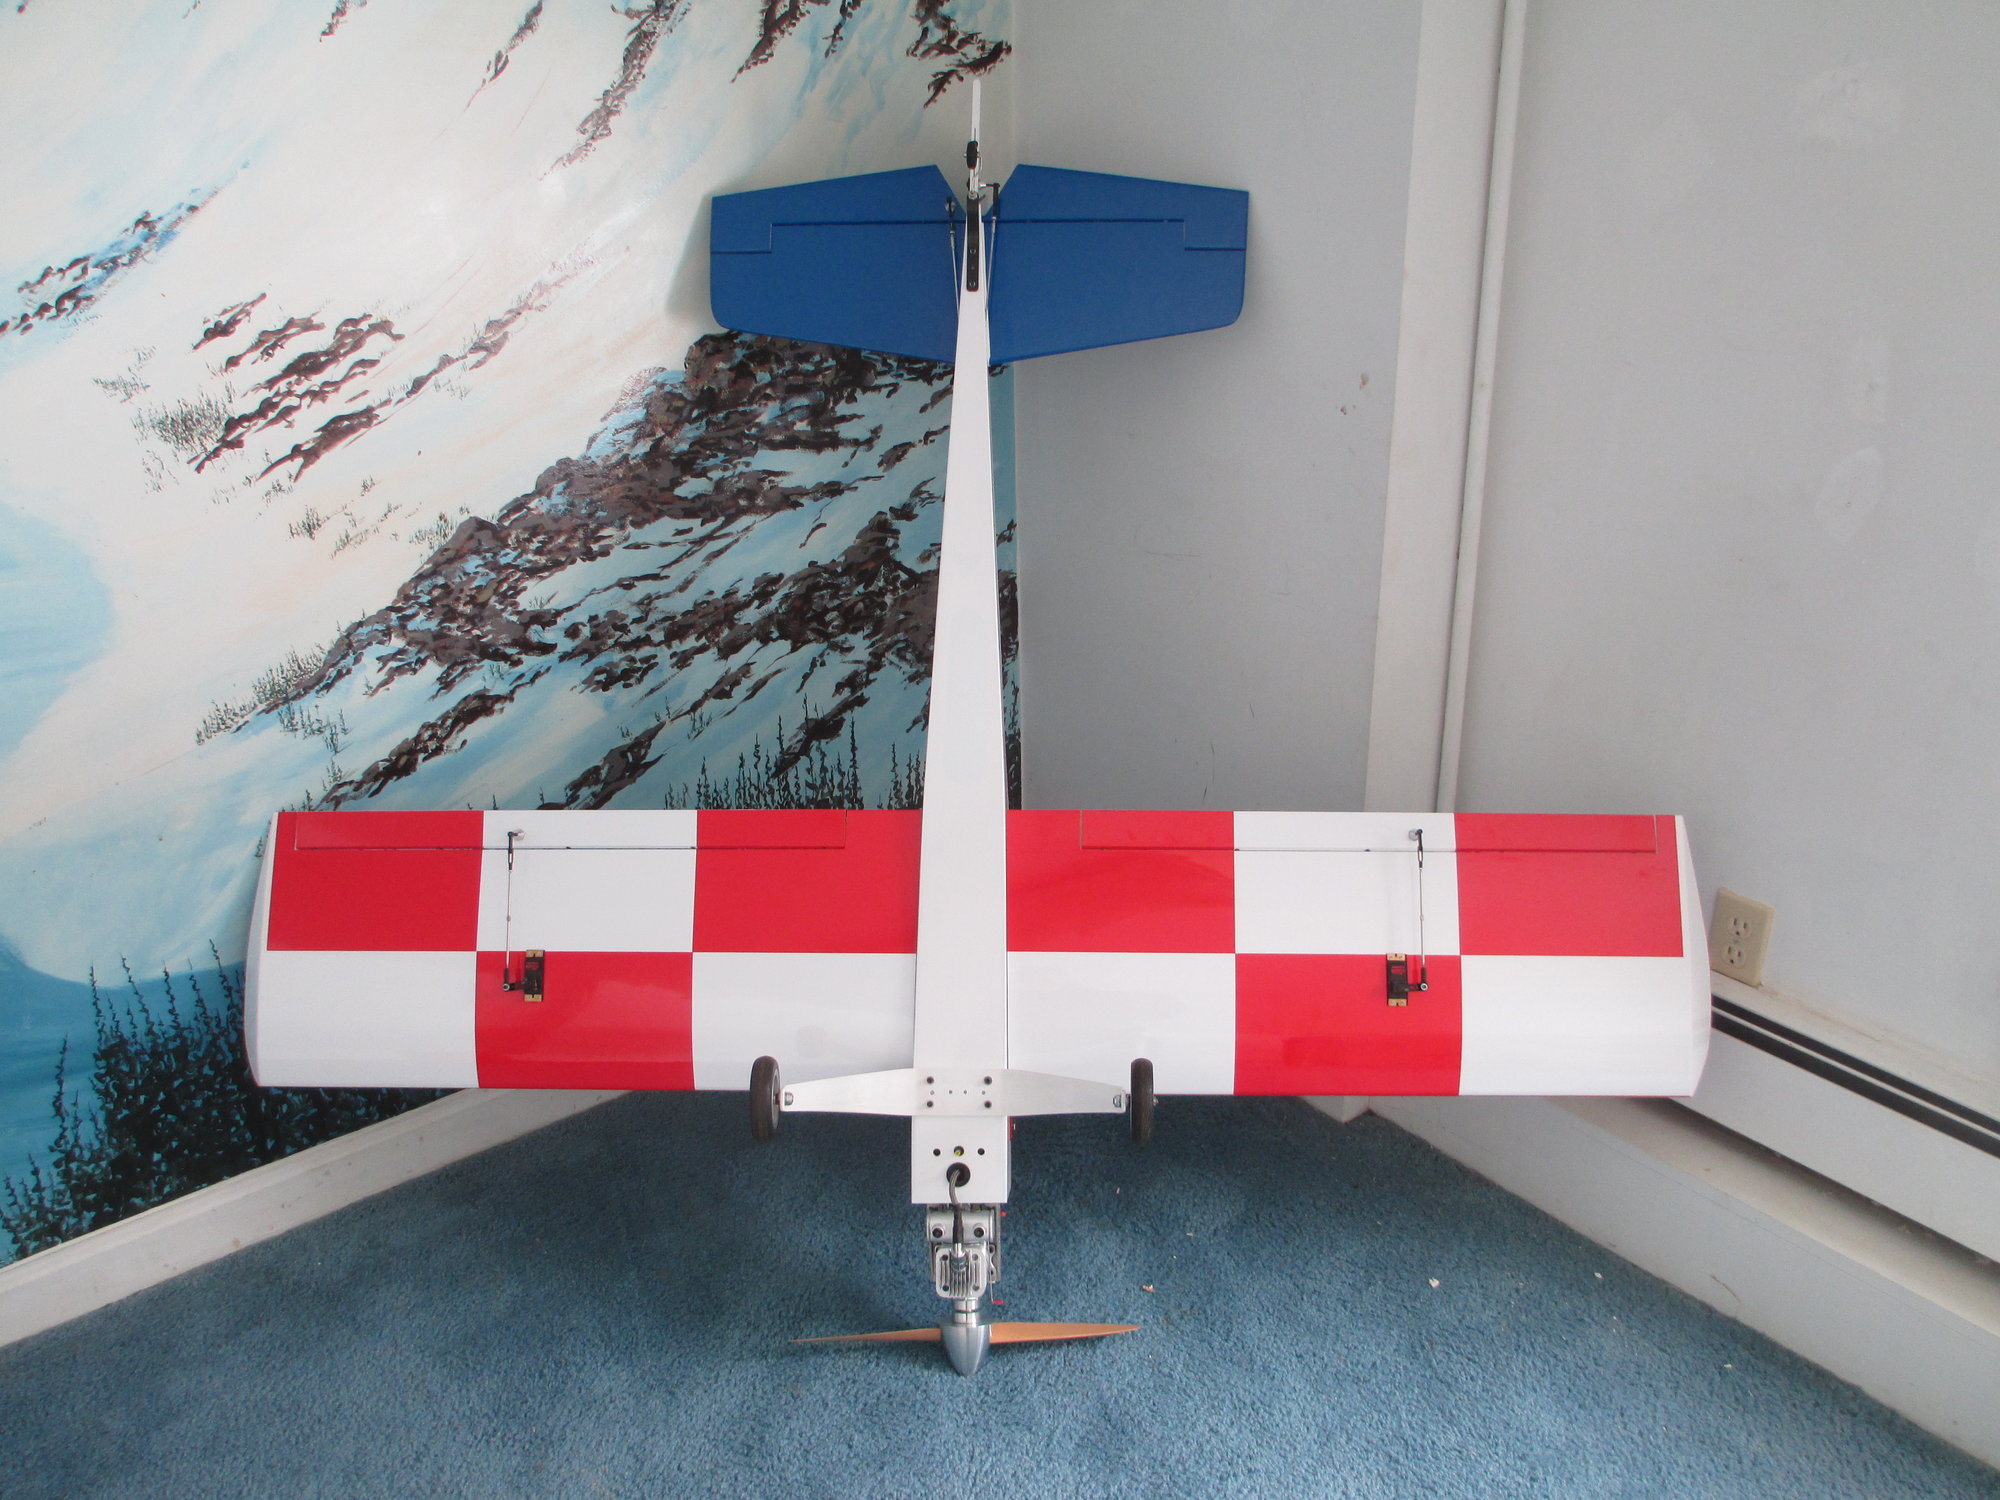
Bottom view, should be easy to see in the sky!

I balanced my plane today and it was a bit tail heavy even though I tried hard to keep the tail light. It took 2-3/4 ounces of lead to get her to balance with the CG set at 4-1/4". This brought the final weight shown on the display.
OK Tiger, as soon as the weather warms up and the snow melts we have a date...TBC
03-24-2018, 03:10 PM
#367
Thread Starter
This was a fun and quick build, but I am a bit burnt out and need some time away from my build table. I still have plans to make a custom fiberglass cowl and wheel pants for my Tiger. With the addition of these items, she just may balance out with the removal of the extra lead weight!
I will post pictures or a video of my maiden for you all to see soon. I would sincerely like to thank all that have followed along either silently watching or actively posting comments along the way. I hope that this thread has helped those of you that may have needed it and for others, I hope that it gives you the incentive to clear off your workbench and build your own Tiger. It's time well spent.
I will post a list of all the components that I used on this build along with links soon. Until my next build, I wish all of you good health and happiness...
03-24-2018, 07:35 PM
#368
Well there you go, one tiger 60 done. Looks good but unfinished without the pants and cowl. So what about that contest and where are all those other tigers talked about in the beginning.
Get some of that time away Vincent, wish you well.
Leroy
Get some of that time away Vincent, wish you well.
Leroy
03-25-2018, 04:18 AM
#369

This was a fun and quick build, but I am a bit burnt out and need some time away from my build table. I still have plans to make a custom fiberglass cowl and wheel pants for my Tiger. With the addition of these items, she just may balance out with the removal of the extra lead weight!
I will post pictures or a video of my maiden for you all to see soon. I would sincerely like to thank all that have followed along either silently watching or actively posting comments along the way. I hope that this thread has helped those of you that may have needed it and for others, I hope that it gives you the incentive to clear off your workbench and build your own Tiger. It's time well spent.
I will post a list of all the components that I used on this build along with links soon. Until my next build, I wish all of you good health and happiness...
I will post pictures or a video of my maiden for you all to see soon. I would sincerely like to thank all that have followed along either silently watching or actively posting comments along the way. I hope that this thread has helped those of you that may have needed it and for others, I hope that it gives you the incentive to clear off your workbench and build your own Tiger. It's time well spent.
I will post a list of all the components that I used on this build along with links soon. Until my next build, I wish all of you good health and happiness...
Thanks for sharing this build with us. As usual, it was an informative thread, and the model is another fine example of your craftsmanship.
I fully understand the burn out thing. I haven't touched a model since last Fall.
03-25-2018, 10:32 AM
#370
Thread Starter
Thank you Tom. Sometimes you just got to step away and recharge those batteries...
Leroy, the pants and cowl will likely get finished this Fall. The contest thing that you were referring to was not mentioned here on my thread as far as I can remember, but rather on another thread, I think it was the Goldberg Tiger Club. http://www.rcuniverse.com/forum/kit-...iger-club.html
Leroy, the pants and cowl will likely get finished this Fall. The contest thing that you were referring to was not mentioned here on my thread as far as I can remember, but rather on another thread, I think it was the Goldberg Tiger Club. http://www.rcuniverse.com/forum/kit-...iger-club.html
03-25-2018, 11:56 AM
#371
Thread Starter
Tiger 60 Specification/Parts Build Sheet
Flying Weight- 9.92 pounds
CG- 4-1/4"
Wheels- 3-1/2" 3.5"-89mm Eight Spoke PU Wheels(pair)_Wheels(Tire and Rim set)_Welcome to SPOTONRC
Engine- DLE-20RA https://www.towerhobbies.com/cgi-bin/wti0001p?&I=LXDWDW&P=0
Fuel & Oil Mix- Red-line Two Stroke Racing Oil (40 to 1)
Prop- Falcon 16x8 https://www.falconpropellers.com/pro...blade-16-x-08/
Spinner- Tru-Turn 2-3/4" Standard Profile Tru-Turn: Welcome
Battery- Life 3200 mAh https://lifesourcebatteries.hobbico.com/hcam6446.html
Battery Balance Lead Extension- Venom 200mm https://www.towerhobbies.com/cgi-bin/wti0001p?&I=LXGYGV&P=7
Spark Plug- NGK CM-6
Gas Tank- 12 ounce
Fuel Dot- Spot On RC Single Fuel Dot(Magnet Style) _Dots And Switches_Welcome to SPOTONRC
Fuel Line- Sullivan ProFlex https://www.towerhobbies.com/cgi-bin/wti0001p?&I=LXGFHS&P=M
Engine Kill Switch- Ultra IBEC Ultra IBEC - Tech-Aero Designs LLC
Wood Glue- Titebond II https://www.towerhobbies.com/cgi-bin/wti0001p?&I=LXHS58&P=0
Epoxy- Bob Smith 30 minute
Rudder Hinges- https://www.dubro.com/collections/hi...y-nylon-hinges
Elevator and Aileron Hinges- https://robart.com/collections/contr...hinge-points-6
Landing Gear- DuBro https://www.dubro.com/collections/la...h-landing-gear
Aluminum Wing Tube- TNT Welcome to TnT's Online Catalog
Wing Bolts- Secraft http://www.secraft.net/shop/step1.php?number=1241&b_code=B20090803051116&ckattempt=1
Wing Servo Extension Leads- Tail Dragger 20 AWG 6" Male 20" Female MPX Single Harness - Taildragger Rc, LLC
Covering- UltraCote Ultracote: Hangar-9
Note: This list will be updated periodically
Last edited by VincentJ; 03-29-2018 at 02:40 AM.
03-27-2018, 07:38 AM
#373
Thread Starter
Leroy, the back of the tank is far enough in front of the wing bolts for me to get my hand in there to install them. I was careful in the planning stage to leave just enough room.
Last edited by VincentJ; 03-27-2018 at 07:41 AM.
 03-28-2018, 02:33 AM
#375
Thread Starter
Rick, I bought those wheels about 5 years ago, but I'm pretty sure this is where I got them from...they are very good quality wheels.
3.5"-89mm Eight Spoke PU Wheels(pair)_Wheels(Tire and Rim set)_Welcome to SPOTONRC
3.5"-89mm Eight Spoke PU Wheels(pair)_Wheels(Tire and Rim set)_Welcome to SPOTONRC
Last edited by VincentJ; 03-28-2018 at 02:37 AM.