


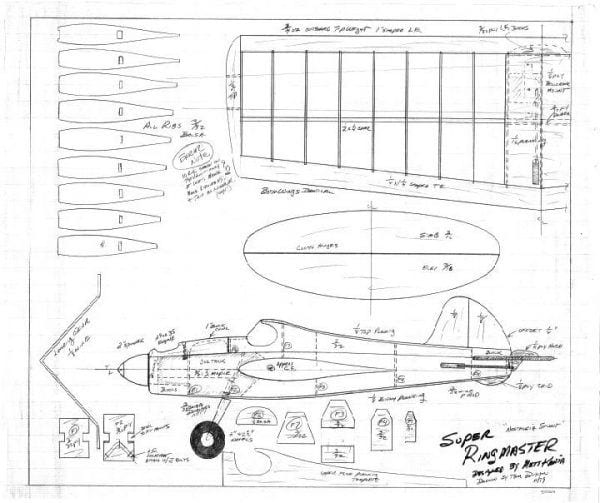
Super ringmaster


The following users liked this post:
AJ Sun (12-26-2023)
 11-07-2023, 08:50 AM
#27
Senior Member
Thread Starter
donnieman okay Still working on my wing but it looks like you have the plan. The ribs look good missing is the longated holes that arecon both ribs both side. Looks like my repop kit is a little different the way they constructed the leading edge and the trailing edge. They incorporated an assembly edge for the trailing edge so the wing would assemble flat. Great Idea. Made the wing assembly easy to assemble. That Lazer cutting sure is nice. I remember my exato 11 knife cutting parts out of Die smash. Two winters ago I was recouping from Nick Sergery replaced 4 disc's. Was wearing a knick brace. But I Bought a Brodak By Slob and built it. Did not fly it until the fall of 22. Flew great nice and slow. It was a Lazer kit and it was a joy to build. Been assembling my wing weight boxes. Got the first one installed on My Ringmaster about 6 years ago. Sure like it, after my latest repair I had to put another 1/4th Oz in the box. You have to drill the lead weights in the center and the screw and blind nut I place some fuel tubing on the screw and it stops the weights that are stacked from moving around. I was surprised what I found when I cleaned my shop up. AJ.
 11-07-2023, 09:15 AM
#28
Senior Member
Thread Starter
Hey Donnieman I did a really good look at your Super Ringmaster plan set, really the only item that is the same is the landing gear. The rest is a little different and this kit I am building just might be a tad wider. Hard to tell. But I will.trace the assembly I have. I really like the kit just not too crazy about the soft Balsa. But the only ribs I redid was rib 1.AJ
11-08-2023, 09:26 AM
#29
Senior Member
Thread Starter
Well this morning was wing mateing day. 30minute epoxy. The instructions said to do that on a flat board. Well that did not work, used wood blocks and C Clamps looks pretty good 24 hour dry. Also my right wing weight box some how slipped and I had to cut it clean and reglue the weight box. It mated pretty well but a little sanding and cleaning the bellcrank mount area is In the adjenda. Along with doing a reinforcement. Routing the lead outs off the left wing. Is going to take some doing. The down line is in the leading edge. Infront of the forward spar. Will probably run a thin metal rod. And attach the lead out line , then pull it thru. The wing tip.formed and the plan calls to drill two holes for the lead out lines. Looks like about 3.5 inch separation and that's guessing. The wing tip is graduated to the trailing edge. PLAN on covering the S Ringmaster wings with heavy Sig Silk. With Nitrate pre dope. Might do the entire plane with Nitrate dope then Butirate. Finish. AJ.
11-09-2023, 05:24 PM
#30
Senior Member
Thread Starter
Got a few things done did a lot of sanding in the center section and after about three hours epoxied in the Control mount now trying to figure on routing the down cable that center section is covered in Balsa so making all the six wing ribs will support the Balsa cover. Mounting the three inch bell crank. I wired the lead out a few day ago and made the cable route thru the wing tip assembly. The kit had plastic lead outs so I had K@S copper tubing and routed the plastic cable lead outs and inserted them in the brass tubing. Now it’s all drying and will mount the bell crank and maybe do a little more sanding.AJ
11-10-2023, 04:37 AM
#31
Senior Member
Thread Starter
Went and looked at my work from yesterday mostly inspecting my progress. What I found I can’t believe, never seen this before, but the thirty minute epoxy has not cure, still tacky left my finger print on the surface. I mixed it right and it’s worked or hardened when I mated the wings. It’s been Rainey the last two days kinda humid, but cool and not warm. Strange. Why it’s not cured. It’s two years maybe three years ago, when I bought this two part thirty minute epoxy. I’ve used my smooth and easy it’s at least twenty years old. And it works sands easy made by hobby proxy. Used it to seal my engine mount and fuel tank area. I’ve got two packs of it one I haven’t opened. But I keep it in the fridge. Along with my dope and spray paint. I am always concerned about it freezing,but my temps in the Hanger where I live is always nice. Guess I will let it set and see what happens. AJ
11-11-2023, 06:16 AM
#32
Senior Member
Thread Starter
Well that epoxy curried this morning it looks good. I recall on the Super Ringmaster Sterling style. The left wing lead out control area was a weak issue. My pop off looks no different. It�s also weak got my lead out down control routed thru that blind area, used a plastic control tube, worked swell. Weighted my Brodak weight box 0.04 Oz all assembled but no weights installed. It uses a blind nut, so you have to epoxy that in place. I have been sanding but my mornings are better arthritis so I started the fuselage tracings and front assembly. It�s where the engine mount rails are installed and the forward wing section. Standard Ringmaster assembly. It�s all wood no Balsa in this assembly. Be nice to have four hands for this job. But the norm is two, makes it a little dicey in the assembly. It�s drying 24 hour cure. I will only use Epoxy on the engine rails. Using Sig Tight Bond frame glue on the Fuselage pre assembly. I know should use epoxy. Foot ball Saturday. Like the College teams Texas A&M, Alabama my favorites. I guess my Epoxy is okay a slow cure is better than fast cure. AJ.
11-11-2023, 06:26 AM
#33
Senior Member
Thread Starter
Well that epoxy curried this morning it looks good. I recall on the Super Ringmaster Sterling style. The left wing lead out control area was a weak issue. My pop off looks no different. It�s also weak got my lead out down control routed thru that blind area, used a plastic control tube, worked swell. Weighted my Brodak weight box 0.04 Oz all assembled but no weights installed. It uses a blind nut, so you have to epoxy that in place. I have been sanding but my mornings are better arthritis so I started the fuselage tracings and front assembly. It�s where the engine mount rails are installed and the forward wing section. Standard Ringmaster assembly. It�s all wood no Balsa in this assembly. Be nice to have four hands for this job. But the norm is two, makes it a little dicey in the assembly. It�s drying 24 hour cure. I will only use Epoxy on the engine rails. Using Sig Tight Bond frame glue on the Fuselage pre assembly. I know should use epoxy. Foot ball Saturday. Like the College teams Texas A&M, Alabama my favorites. I guess my Epoxy is okay a slow cure is better than fast cure. AJ.
11-11-2023, 06:38 AM
#34
Senior Member
Thread Starter
Don�t know why I thought about this. But I worked at General Dynamics in Fort Worth from 86 to 89. Flew at Carswell and met GDs Chief Pilot. We were both flying the Top flight Magusin his was a Red Head McCoy and my plane had the Fox 35 Stunt. He flew right wing lead out I flew the standard left wing lead out. Great guy he was about 20 years my senior and we enjoyed talking about our planes. He is no longer with us. But I learned several building mods when he passed his wife gave me some of his UC things. One item was the Higley books and several of his tools he used to build his planes. Classic stuff. From a great guy, that I really respectedAJ..
11-12-2023, 11:17 AM
#35
Senior Member
Thread Starter
Well this Am I did a little work on the lead out portion of my wing it�s mated and looking pretty good to my standards I did some reinforcements and routed the control cables thru the enter of the wing tip and not under and thru Copper tubing with the plastic antichafe plastic. After that I went to the fuselage traced several parts and joined the fuselage to the motor and fuel tank wing leading edge assembly. Used Epoxy and about fourty attach clamps. Slow cure thirty minute. Plan on a 24 hour cure. Got my first look at my tank area and my Brodak fuel tank will fit. On top of the engine rails. That can cause vibration in the metal Stunt tank. Got an Idea that I�ve thought about. And tried it on my Veco Chief. But that tank is enclosed. My Super Ringmaster the tank is under cover that held on with two dowel pins and two small magnets just in front of the cockpit. No indication of how the tank is secured in the plan. So that means open season and lots of Ideas. AJ
11-13-2023, 04:50 PM
#36
Senior Member
Thread Starter
Well I am officially shut down. Early this morning I was cutting some ply on my table saw, and yes Imdid it cut the you know what out of my thumb. Did not hit the bone but it was close took 6 stitches man the num needle felt good. Bummer can�t even fly right thumb. Welcome to the dumb70s. Had that small saw for at least 55 years. Never cut my self, but this time it�s a duzy, I hate stitches. AJ
11-16-2023, 11:51 AM
#37
Senior Member
Thread Starter
Well doing a little glueing and just soldiered my elevator rod the elevator end is threaded. Provided in this zmicro machine model. Finally found where guys on Stunt Hanger had bought and built this Super Ringmaster. No comment about soft Balsa. It’s been giving me fits especially on the fuselage parts and I’ve busted a few Balsa parts on the wing. Did not care for the way they wanted to cover the center section of the wing. So I extended to another wing rib and used a three piece cover with the tapered trailing edge a much smaller width. Should make it a lot stronger. They were butting up to the edge with no strip in placement. Not good. But I started comparing old plans and tried to narrow down the UC plane that was given to me. I think it’s a Viking, a few parts missing, but it sure resembled my Veco Chief. But it’s definitely a Sterling kit wood is hard as a rock and some is dis colored. Old kit, never built one or even seen one. Not sure but I think Sterling or maybe top flight had a kit called the Viking. The only plane I built in Top Flight was the Magishion. Can’t spell it but it’s retired and power is the Fox Stunt 35. AJ
11-17-2023, 07:58 AM
#38
Senior Member
Thread Starter
Well good morning guys and gals! Doing a finish up on my wing it’s about ready to install in the fuselage. It’s looking good. Now comes the fun part? Mating that wing assembly. Got to slide it in from right to left. Installed a few reinforcements to insure the wing will be square. Finished the repair on my Veco Chief really Need to rebalance the wing tip to wing tip, then the nose to tail adjustment. Probably need more weight on the right wing. Put a little more off set on my rudder. And my engine is inverted with 2 degrees right off set. When I hang the plane the nose points just a little bit out side. It has solid wire turnbuckle lead outs, my Magishen has the Same, but lately I’ve been going to the .025 cable lead outs. Kinda grounded until my Thumb heals. It’s looking good no Infection and I just missed the bone. Still very sore. AJ.
11-18-2023, 09:44 AM
#39
Senior Member
Thread Starter
Saturday morning fixing to be the start of this holiday stuff. My Super Ringmaster Wing is complete and I added some Balsa filler to get ready for the sanding and three coats of Nitrate Dope. Had to order a Classic fuel tank from Brodak will not get it until Late January. The 3.5 ounce tank is just to long. And so I ordered a 2.5 I dont fly the full AMA pattern, so that 2.5 ounce tank fits my abilities at 77. The top cowl comes off and is held on with magnets. So I can finish the plane. Also ordered a Fox engine templet. And a 5 Oz fuel syringe. Been needing one like to only load 2.5 ounces of fuel. My Top Flight Magishen has a Five ounce tank going to Change that to a smaller unit. For some reason I think it’s not feeding properly. Old plane built it fourty years ago. Old perfect tank. My Ringmaster S1 has a 2.5 Oz tank and it’s about right on the flight time. About three minute flights.AJ
11-19-2023, 03:56 PM
#40
Senior Member
Thread Starter
Well the wing got mated on the fuselage today went really well, little sanding but the fit was good and tight. Ran into a small issue with the right engine rail. Need to can’t the Fox Stunt 35 about two degrees right the nose narrows down about a quarter inch to mate with the nose and belly fillet. So the engine rails cut into the sides causing a fouling issue with metal engine mount. Needing to install blind nuts to secure the Fox. Ordered a Fox drill mount to accomplish this. Also the elevator control rod fit great after cutting the center cover assembly. Going to apply heat shrink on the clip to insure it will not come lose. All in all it’s doing pretty well.AJ
11-21-2023, 07:03 AM
#41
Senior Member
Thread Starter
Tried to get on Stunt Hanger? I think that’s what they call it! Signed up but haven’t hurd nothing yet if it was approved. Several posts about the Micro Model Super Ringmaster. That’s what I am building and a few U Control guys looking for the kit. One on Worth Point. I don’t really recall what I paid ten years ago for mine. But that worth Point web site is very expensive with all their resale items. Several or a few guys commented about the windscreen and how hard it was to,attach it to the model. Not their yet on the build. But I have a few ideas, I got from the higley books on attaching windshields. Tried posting eye candy again and still will not do it. AJ
11-23-2023, 06:39 AM
#42
Senior Member
Thread Starter
Watch out on Stunt Hanger they charged my CC $48.56 and then $1.98. Had the fraud cancel my Credit Card. Not Good. Cooking today that bird should be done about 1;pm wish I could say that about my Super Ringmaster. Been enjoying the build. And made several modifications. It will up the weight. But that will also slow her down. Balsa is really soft. Have a nice turkey day, or ham day as some say.AJ
11-24-2023, 02:20 PM
#43
Senior Member
Thread Starter
Oh I ate tooo much, always do that, started to coat my wing on the Super Ringmaster using Nitrate dope. Getting that started takes several coats to get the wing ready for silk. Decited to wait on the new fuel tank and my Fox Stunt 35 template it’s going to be tight fit. I want to get it right, it’s important, very tight fit in a limited space. Still attach the horizontal and vertical and set up the Elevator. I am thinking about placing my Fuselage weights. That’s going to be a factor. Hope every body enjoyed the holiday!AJ.
11-27-2023, 07:21 AM
#44
Senior Member
Thread Starter
Well got the side cockpit panels glued in let it dry overnite this morning I applied ammonia and water mixture and clamped the forward cockpit panel to F-3. Reinforced it with ply, first a few days ago. Still waiting on Kens Machine stuff to arrive. Ordered a nice Five ounce fuel syringe and the Fox Stunt 35 drill templet.Really got cold last nite. Brought the Super Master in the apartment to bend and glue the cockpit to F-3 round former. You all be safe! AJ.
11-29-2023, 04:37 PM
#45
Senior Member
Thread Starter
Well had a lot on my plate today. But I managed to start working on the horizontal and elevator. Cleaned up all the edges and applied the old time fabric hinges. Yep I use Polyfibre light fabric pinked edges. Micro Models did make a nice kit of the Suoer Ringmaster only complaint I had was some of the Balsa was soft. And a few details in the assembly manual was way out of sequence. So building experience was a must. Still waiting on back ordered items. Got my 40th anniversary Fox Stunt 35 mounted up on my S-1 Ringmaster. Compression is great. Had to order new landing gear after my last crash. The Brodak gear is perfect and is just like the Sterling gear. Just a tad longer. So you can use a -11 Prop. I like that. Great build guys, I can see why UC guys are looking for the micro models Super Ringmaster.AJ
12-03-2023, 09:24 AM
#46
Senior Member
Thread Starter
Finished up the horizontal stab and still glueing on the hindge. Using Ambroad glue. Heard that a similar glue is used on arrow feathers. After I get all 12 hindge secured I will start applying Nitrate dope to fill in the hindge material. Still waiting on my order from Toms Machinery. Still have lots to do. Need to look over my By Slob. I will fly it,when I start flying in March 2024. Got all the Christmas decorations up. Made some Burbon balls Army plays Navy next Saturday. Ya I am Army, planning to do a Hanger sale that Friday and Saturday.down sizing big time. AJ.
12-05-2023, 06:38 AM
#47
Senior Member
Thread Starter
Well yesterday I inspected my progress and all my glue joints. Did a little sanding on the top of the fuselage. Found a couple loose joints at the fuselage formers. Reglued those areas and used clamps looking at the vertical assembly and how it will attach goes over the horizontal and offset about two degrees. Really not illustrated in the plan, no top view, but it’s centered and the vertical attaches to the fuselage section the rudder part sets on top of the vertical. Any way the rudder offset don’t fit flush with angle of the fuselage and the flat of the horizontal. In my way of thinking off setting the engine two degrees right and the rudder two degrees right. That’s a lot of off set! Plus one ounce of wingtip weight. All my U Control planes have rudder off set. My S1 Ringmaster has rudder offset, but my engine on my profile version is not offset. And my wing counter weight is about 1.8 ounce counting in the weight of the box I installed. With 58 foot .018 lines. I tell ya something ain’t right here, on my Super Ringmaster. As illustrated on the assembly guide. Kinda wonder if they test flew this Micro Models Super Ringmaster. Stunt Hanger had some guys building the plane, but I never Hurd the flying results, some builders questioned the assemble instructions, just how bad the instructions were on the assembly of the plane. Tried joining the Stunt Hanger, gave them my credit card info, we will not charge you! Then they did charge on two occasions. So I did not get on the web site.AJ
12-07-2023, 07:18 AM
#48
Senior Member
Thread Starter
Well to day is Pearl Harbor day. My Mom and older Sister now deceased were their and Mom was hit twice schrapnll and a round in her hip. my Dad was At the big Island training center. They were not hit. Mom was transferred on a Boeing 314 along with my sister state side. I remember the story’s it was scary time for them. Rest well I will always remember you. Now back to that Super Ringmaster. Got my engine drill block and installed it. Started drilling the hard wood mount. The right mount and left mount went in a certain way, really one one way. But apparently the right mount had a knot in the wood. It just will not drill. So far I’ve used two drills and dulled both of them. Resharpened them and the same thing. Got ahead Of my self and tapered the nose just like the plan instructions illustrated. Big mistake. Because now the blind nuts will not insert properly. The nuts in the kit are way to big, but I had a set of blind nuts that were perfect and fit the rails that are tapered. Hope I can fix this to my satisfaction. The drill guide is nice and just fit the rails. Not using the guide would have only made the motor mount holes. That knot in the wood is not good, drilling it really slow. Lots of smoke. Really never experienced this after all the planes I’ve built. Don’t get me wrong it’s fixable. Just concerned about the mount and will that knot fail and break into, from vibration or engine run fatigue. Another question is how long is that Knot on that rail? The forward hole drilled easy and the blind nut inserted no problem. Same with the left mount it drilled and the nuts inserted no issue their. Oh on a good note Brodak called me and said my special order 2.5 fuel Oz tank was ready to ship. I was not expecting it until mid January 2024. The cost $78.00. Well it’s on it’s way and the cost is $38.00 that’s great news. Well back to drill starping, might use linseed oil in the hole. A little lube just might help. AJ
12-07-2023, 06:04 PM
#49
Senior Member
Thread Starter
Well I used linseed oil and got out my Air drill and drilled thru that knot. Got the blind nuts installed and applied epoxy to secure those blind nuts. Decided to do a reinforcement on the engine hard wood rails. Just to be sure they hold up and not fail tomorrow I might mix up some smooth and easy and coat the tank area, and install the Fox Stunt 35 and finish up the nose block. Next step is to remove the Fox and build the tank hatch it blocks into the nose piece and is secured by two wood dowels the rear is secured with two magnets. Reinstall everything and start this weight and balance computations. I’ve weighted everything. But I am hoping for a max to weight to be around 34 Oz. And looking for a tad heavy in the nose. AJ
12-10-2023, 03:13 PM
#50
Senior Member
Thread Starter
Well today I was able to mount the Fox 35 Stunt and it’s about one degree out board as planned installed and temporarily installed the 2.5 Oz tank it fit great had to cut and size in the needle valve also glued in place the nose block that attaches the top tank and engine cover. Might do a bottom cowl vent under the two inch spinner to vent engine hot air. Next step would be to remove the motor and fuel tank and cut to shape the top cowl cover. Lots of sanding and forming this week.AJ